.ask is an anonymous question-asking platform similar to NGL, designed to be self-hosted for maximum control and privacy. It leverages Cloudflare’s network for fast and reliable performance, ensuring that your platform is always accessible. With a focus on security and user control, .ask allows you to manage your data independently. Its intuitive interface makes it simple to ask and answer questions anonymously, making it an ideal solution for both personal and community use.
Features
Anonymous Questions: Users can ask questions anonymously without revealing their identity.
Self-Hosted: Complete control over your data and privacy by hosting the platform yourself.
Cloudflare Integration: Utilizes Cloudflare’s network for fast and reliable performance.
Intuitive Interface: Easy-to-use interface for asking and answering questions.
Social Share Ready: Answered will be generated into socialmedia shareable card which you can directly share right from the app.
Security Focused: Ensures data security with JWT authentication.
Customizable: Customize the platform to fit your needs
Community Friendly: Ideal for both personal use and community engagement.
Open Source: Contributions are welcome, and the project is licensed under GPL 3.0.
Deploy
Requirements
Login to cloudflare, create a worker project named ask-api and create another pages project named ask-web
Create a JWT secret from here (length 32): https://link.shovon.me/gen-jwt or run this in terminal node -e "console.log(require('crypto').randomBytes(32).toString('hex'))"
Deploy With GitHub Actions
Create a new repo using this template
Goto the repo Settings -> Secrets and variables -> Actions. On Repository secrets section add these secrets
Name
Value
Requirement
CLOUDFLARE_API_TOKEN
Token generated from requirements step 2
Required
NEON_DATABASE_URL
DB URL string from requirements step 3
Required
JWT_SECRET
JWT secret from requirements step 4
Required
DEFAULT_USER
Default username for login
Required
DEFAULT_PASSWORD
Default password for login
Required
API_CUSTOM_DOMAIN
Custom domain for ask api
Optional
Goto the Actions tab on the repo, select Deploy API and Web action, select Run workflow, branch main, Run workflow
Manual Deployment
Clone this repo locally and run pnpm install
Open apps/api/wrangler.toml, if you are going to use a custom domain for the short link, uncomment line 4 and replace {{CUSTOM_DOMAIN}} with your custom domain.
Create a .env file in apps/api/ and fill in NEON_DATABASE_URL, DEFAULT_USER and DEFAULT_PASSWORD
Put the Neon database string on worker secret using: pnpm db:set
Put the JWT secret on worker using: pnpm jwt:secret:set
Run pnpm worker:deploy:api to deploy the api
Create a .env file in apps/web/ and fill in NEXT_PUBLIC_WORKER with the custom domain or the worker url got from previous command
Run pnpm pages:deploy:web to deploy the web client
Contributing
We welcome contributions! Please follow these steps:
Fork the repository.
Create a new branch:
git checkout -b feature-branch
Make your changes and commit them:
git commit -m "Description of changes"
Push to the branch:
git push origin feature-branch
Create a pull request.
License
This project is licensed under the GPL 3.0 License. See the COPYING file for details.
Contact
For any questions or feedback, please open an issue
ENCM 509 – Fundamentals of Biometric Systems Design Labs
Lab 1
Introduction to libraries such as NumPy, Matplotlib, and SciPy
Lab 2
The purpose of this lab is to utilize statistical analysis to distinguish between “genuine” and “imposter” written signatures. Before applying statistical analysis, we will be collecting written signatures using the Wacom Intuos tablet. We’ll use this tablet to capture coordinate and pressure values at 200 points/sec as the pen moves across the tablet. The tablet is also capable of recognizing 1024 levels of pressure which will be especially useful in statistical analysis later on. In addition, we’ll also utilize the software SigGet to collect and convert the data to CSV files collected by the tablet. Throughout the lab we will utilize these CSV file samples to plot histograms, 2D and 3D colormaps, as well as normal distributions of both velocity and pressure and the calculation of both mean $(\mu)$ and standard deviation $(\sigma)$ in order to understand and compare trends in the distribution/dispersion of the data between both “genuine” and “imposter” written signatures to see how they differ.
Lab 3
The purpose of this lab is to understand biometric-based verification between genuine and imposter signatures for 1:1 matching. In the previous lab, we utilized values such as pressure, time, and coordinates, however, in this lab, we will separate the data into 2 simple classes and train the data based on the EM algorithm. After training the data, we will also utilize the Gaussian Mixture Model (GMM) to calculate log-likelihood scores in order to distinguish the classes of genuine and imposter signatures, essentially “verifying” if the signature is genuine or not. In addition, we will also use the log-likelihood score to calculate both the mean $(\mu)$ and standard deviation $(\sigma)$ of both the imposter and genuine scores in order to plot normal distributions, illustrating how they vary with one another.
Lab 4
In this lab we will be focusing on image pre-processing and feature extraction of fingerprints. We will be collecting fingerprints using the Digital Persona UareU 4500, and because the quality of data is affected by many factors, we will collect both good and bad quality fingerprints for analysis. Throughout the lab we will conduct a number of image processing techniques such as normalization and segmentation as well as pre-processing and de-noising techniques such as contrast enhancement (histogram equalization) and the Wiener filter. After applying these processing techniques, we will then calculate the number of Minutiae (ridge endings and bifurcations) and Singularities (points of cores, deltas) in order to assess their impact on the image details of the fingerprints.
Lab 5
In this lab we will be focusing on image processing and fingerprint matching. We will be using fingerprints collected by using the Digital Persona UareU 4500. We will be focusing on two main matching algorithms, matching based on Minutiae count (ridge ending and bifurcation), and matching based on scores obtained by Gabor filtering. In addition, we will also change the parameters of Gabor filtering such as the angle and frequency in order to see if it has a visual impact on the processed fingerprint image. Lastly, after running both types of matching algorithms, we will also select thresholds in order to see their impact on the number of true positive matches and false negative matches.
Lab 6
In this lab, we will explore facial recognition via Principal Component Analysis (PCA), using the AT&T Database of Faces. Employing Python and Jupyter Notebook, our focus will be on face detection, image processing, and classification through PCA feature extraction and Euclidean Distance matching. We will adjust PCA parameters to study their impact on facial representation and experiment with threshold settings to analyze their effects on true positive and false negative match rates. This practical approach aims to deepen our understanding of biometric verification within facial recognition, blending theoretical concepts with hands-on experience.
Lab 7
In this lab, we will undertake the task of hand gesture recognition using data collected by the Ultra Leap developed by Leap Motion. After the data is collected, we will be utilizing deep learning in order to regonize different hand gestures. More specifically, we will utilize a classifier, Long Short-term Memory (LSTM) which is a deep learning model for time-series analysis. Throughout the lab, we will prepare our data, preprocess it, create our model, and performing classification while also changing specific parameters before classification such as the testing set size, number of LSTM layers, and the dropout probability in order to see their effects on accuracy, etc.
Lab 8
In this lab, we explore Bayesian Networks (BNs) for machine reasoning using PyAgrum.
We’ll construct BNs that mimic real scenarios, like the Diamond Princess infection outbreak.
The lab involves setting up network structures and conditional probability tables (CPTs).
We’ll perform inference to understand how factors like age and gender influence susceptibility.
Exercises in Jupyter Notebook will guide us through these processes.
By manipulating BNs, insights into probabilistic decision-making will be gained.
We aim to show BNs as a robust framework for reasoning under uncertainty.
This practical approach will enhance our comprehension of BNs’ applications.
Ultimately, we’ll learn to make informed decisions based on probabilistic models.
The project provides a backend for the BeresIn platform, featuring user authentication, admin and user services management, and category CRUD operations, with a focus on secure data handling and a well-structured API.
Authentication / Authorization:JWT ### Installation Guide for beresindev-beresin-express-backend-app
Step 1: Clone the Project
# Clone the repository from GitHub
git clone https://github.com/beresindev/beresindev-beresin-express-backend-app.git
# Change into the project directorycd beresindev-beresin-express-backend-app
Step 2: Install Dependencies
# Install all required npm packages
npm install
# or
yarn install
# or
pnpm install
# or
bun install
Step 3: Configure Environment Variables
Copy the example environment file to create a local environment file:
cp .env.local.example .env.local
Update the .env.local file with your specific configuration:
# Populate the database with an admin user
npx knex seed:run --specific=create_admin_user.ts
Step 6: Start the Application
# Start the Express server
npm start
# Access the API at http://localhost:3000
This guide provides full setup instructions for the backend application using Express, JWT for authentication, Knex for database migrations, and PostgreSQL as the database. Ensure PostgreSQL is configured and running.## Deployment
To deploy this project run
1. Copy .env.example into .env
cp .env.example .env
2. Generate JWT_SECRET
openssl rand -base64 32
Output must be like this:3y9KcY0Dl1KzT9frFyM7hO0NBWwO3F5yPiB3uF9xUho=
3. Update src/index.ts for production
import dotenv from 'dotenv';
import app from './app';
dotenv.config({ path: '.env' });
const PORT = parseInt(process.env.PORT ||'3000', 10); // Konversi PORT ke number
const HOST = '0.0.0.0'; // Dengarkan di semua alamat IP agar dapat diakses secara publik
app.listen(PORT, HOST, () => {
console.log(`Server running on http://${HOST}:${PORT}`);
});
4. add in package.json
"scripts": {
    "start": "node dist/index.js"
}
5. Rename Configuration ecosystem.config.js.example into ecosystem.config.js
The ecosystem.config.js file is used with PM2 (a process manager for Node.js applications) to manage and automate various aspects of running your application in production. Then fill as needed.
To run Node.js applications (including compiled TypeScript applications) on a VPS continuously, you can use PM2, which is designed to run Node.js applications in production mode, keeping them running even after a server crash or restart. Here are the complete steps:
7. Install PM2
npm install -g pm2
8. Compile the application to JavaScript first:
npx tsc
9. using TypeScript and the entry point file is directly in src/index.js, run:
pm2 start dist/index.js --name "my-app"
10. To ensure the application continues running after a VPS restart, enable the PM2 startup feature:
pm2 startup
API Reference
0. Miscellaneous
Endpoint: GET /profile
Parameter
Type
Description
None
–
No parameters required
Health check to verify database connection, size, latency, and errors.
Setting DecoratorProperty as the metaclass adds a @decorator_property decorator to the body of the function. decorator_property behaves just like python’s builtin property, but it provides an additional interface for interacting with the property via a decorator.
Usage
A typical usage is for setting properties of instances which are also functions. Here is a minimal working example:
fromdecsetterimportDecoratorPropertyclassClassWithFunctions(metaclass=DecoratorProperty):
def__init__(self):
self._function_foo=None@decorator_propertydeffunction_foo(self):
returnself._function_foo@function_foo.setter(decorator=True)deffunction_foo(self, value):
self._function_foo=value# Instantiate the classcwf=ClassWithFunctions()
# Set cwf.function_foo to `my_function`# with normal @property this would not work@cwf.function_foodefmy_function(x):
print("hello from my_function")
returnx**2print(cwf.function_foo(4))
You can also use the @<function_name>.decor decorator to specify your own decorator callback. This way you can add side-effects to the decorator (you could even make it not set the value but do something completely different). In this case the decorator prints "hello from decor" at decoration time.
...
@function_foo.setterdeffunction_foo(self, value):
self._function_foo=value@function_foo.decordeffunction_foo(self):
defdecor(fun):
print("hello from decor")
self._function_foo=funreturnfunreturndecor
...
Note that, similarly to decorators with arguments, the function decorated with @function_foo.decor has to return the decorator. The internal property _function_foo is set by reference to the instance of the class encapsulated in the closure of decor.
The decorator does not have to be a setter. In the following example the decorator of an integer property incr decorates the function to run incr number of times while incrementing its input.
fromdecsetterimportDecoratorPropertyfromfunctoolsimportwrapsclassFunctionRepeater(metaclass=DecoratorProperty):
"""Decorator of property 'incr' runs the wrapped function n times"""def__init__(self, incr=1):
self._incr=incr@decorator_propertydefincr(self):
returnself._incr@incr.setterdefincr(self, value):
self._incr=value@incr.decordefincr(self):
defouter_wrapper(fun):
@wraps(fun)definner_wrapper(x, **kwargs):
returntuple(fun(x+i, **kwargs) foriinrange(self._incr))
returninner_wrapperreturnouter_wrapper
The decorated square keeps a reference to instance of FunctionRepeater such that if the value of
repeat.incr=5square(3) # -> (9, 16, 25, 36, 49)
Sharp corners
This of course doesn’t work since cwf is not initialised at the time of decoration.
...
@cwf.function_foodefmy_function(x):
print("hello from my_function")
returnx**2# ^ Throws NameError: name 'cwf' is not definedcwf=ClassWithFunctions()
If you want to define your function before instantiating the class, just use normal way of setting properties:
defmy_function(x):
print("hello from my_function")
returnx**2cwf=ClassWithFunctions()
cwf.function_foo=my_functioncwf.function_foo(1)
Dev
Run coverage locally:
coverage run --omit="test_*.py" -m pytest && coverage html && open htmlcov/index.html
Experiments with varying numbers of hidden units, LSTM cells and techniques like gradient clipping were conducted using static_rnn and dynamic_rnn. All networks have been optimized using Adam on the MSE loss function.
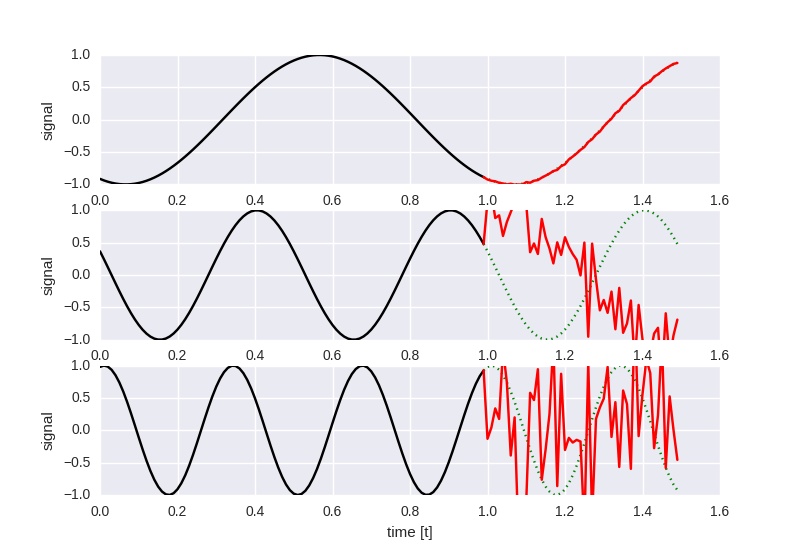
Experiment 1
Given a single LSTM cell with 100 hidden states, predict the next 50 timesteps
given the last 100 timesteps.
The network is trained on a sine of 1 Hz only using random shifts, thus fails on
generalizing to higher frequencies (2 Hz and 3 Hz in the image); in addition, the
network should be able to simply memoize the shape of the input.
It was optimized with a learning rate of 0.001 for 200000 iterations and
batches of 50 examples.
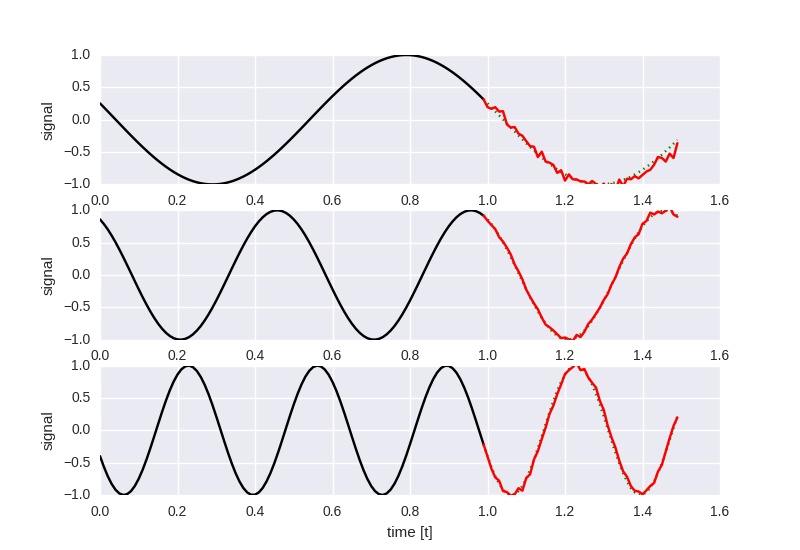
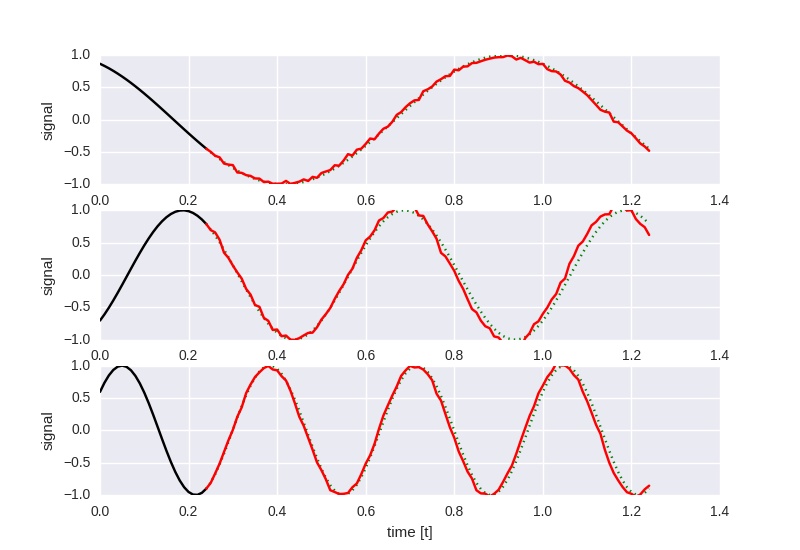
Experiment 2
Given a single LSTM cell with 150 hidden states, predict the next 50 timesteps
given the last 100 timesteps.
The network is trained on sines of random frequencies between 0.5 .. 4 Hz using
random shifts. Prediction quality is worse than for the 1 Hz only experiment above,
but it generalizes to the 2 Hz and 3 Hz tests.
It was optimized with a learning rate of 0.001 for 300000 iterations and
batches of 50 examples.
At loss 0.614914, the prediction looks like this:
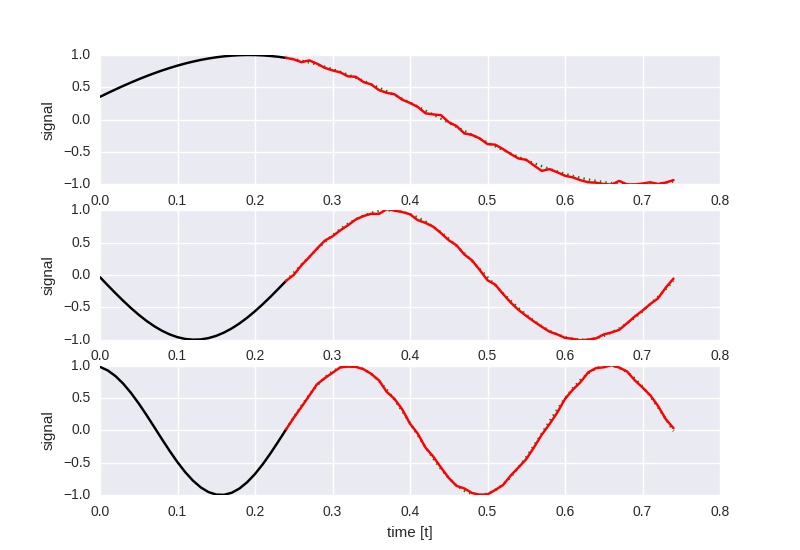
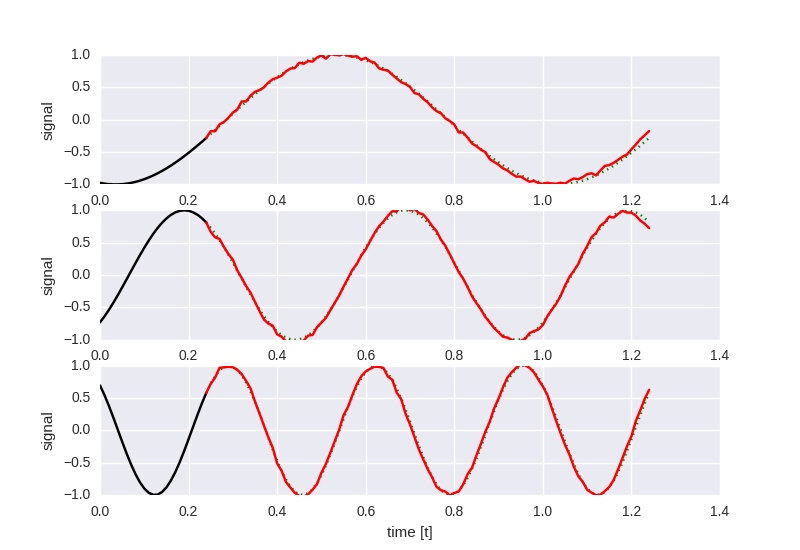
Experiment 3
Given a single LSTM cell with 150 hidden states, predict the next 50 timesteps
given the last 25 timesteps.
The network is trained on sines of random frequencies between 0.5 Hz and 4 Hz using
random shifts. Prediction quality is worse than for the 1 Hz only experiment above,
but it generalizes to the 2 Hz and 3 Hz tests.
It was optimized with a learning rate of 0.0005 for 500000 iterations and
batches of 50 examples.
The following image shows the output at loss 0.177742:
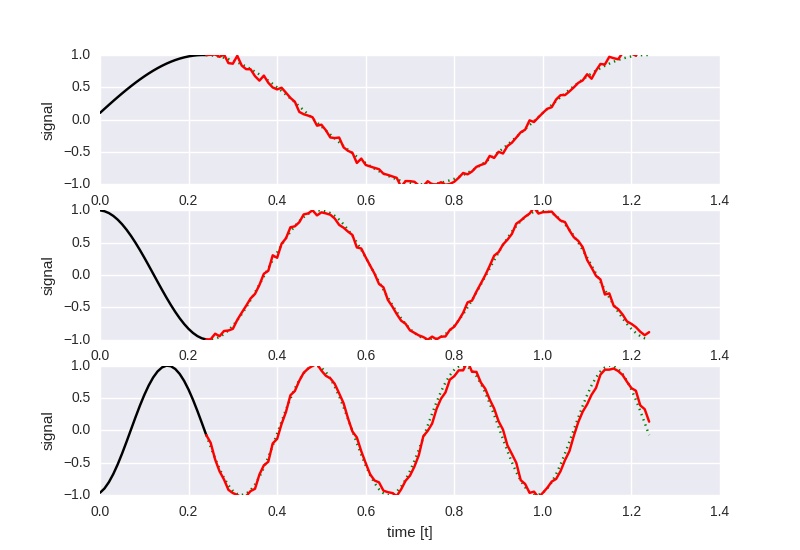
The following is the network trained to predict the next 100 timesteps
given the previous 25 timesteps; the parameters are otherwise unchanged.
This is the result at loss 0.257725:
Experiment 4
Same as the last experiment, however using 500 hidden states and gradient clipping
for the optimizer as described here:
Losses get as low as 0.069027 within the given iterations, but vary wildly.
This is at loss 0.422188:
Experiment 5
This time, the dynamic_rnn() function is used instead of rnn(), drastically improving the
startup time. In addition, the single LSTM cell has been replaced with 4 stacked
LSTM cells of 32 hidden states each.
The network is trained with learning rate 0.001 for at least 300000 iterations
(with the additional criterion that the loss should be below 0.15).
The following picture shows the performance at loss 0.138701 at iteration 375000.
When using only 10 hidden states, training takes much longer given a learning rate of 0.001
and reaches a loss of about 0.5 after ~1200000 iterations, where convergence effectively stops.
The following used 10 hidden states and a base learning rate of 0.005 in combination with a
step policy that reduced the learning rate by a factor of 0.1 every 250000 iterations.
Similar to the previous experiment, optimization was stopped after at least 300000 iterations
have passed and the loss was below 0.2.
The picture shows the outcome after 510000 iterations at a loss of 0.180995:
Experiment 6
Much like the last experiment, this one uses 10 hidden states per layer
in a 4 layer deep recurrent structure. Instead of using LSTM layers, however,
this one uses GRUs.
Because the loss did not go below 0.3, training was stopped after 1000000
iterations.
This document summarizes commonly used VPS performance testing scripts, covering CPU, disk, network, stress testing, and more. Works on Linux systems like Ubuntu/Debian/CentOS.
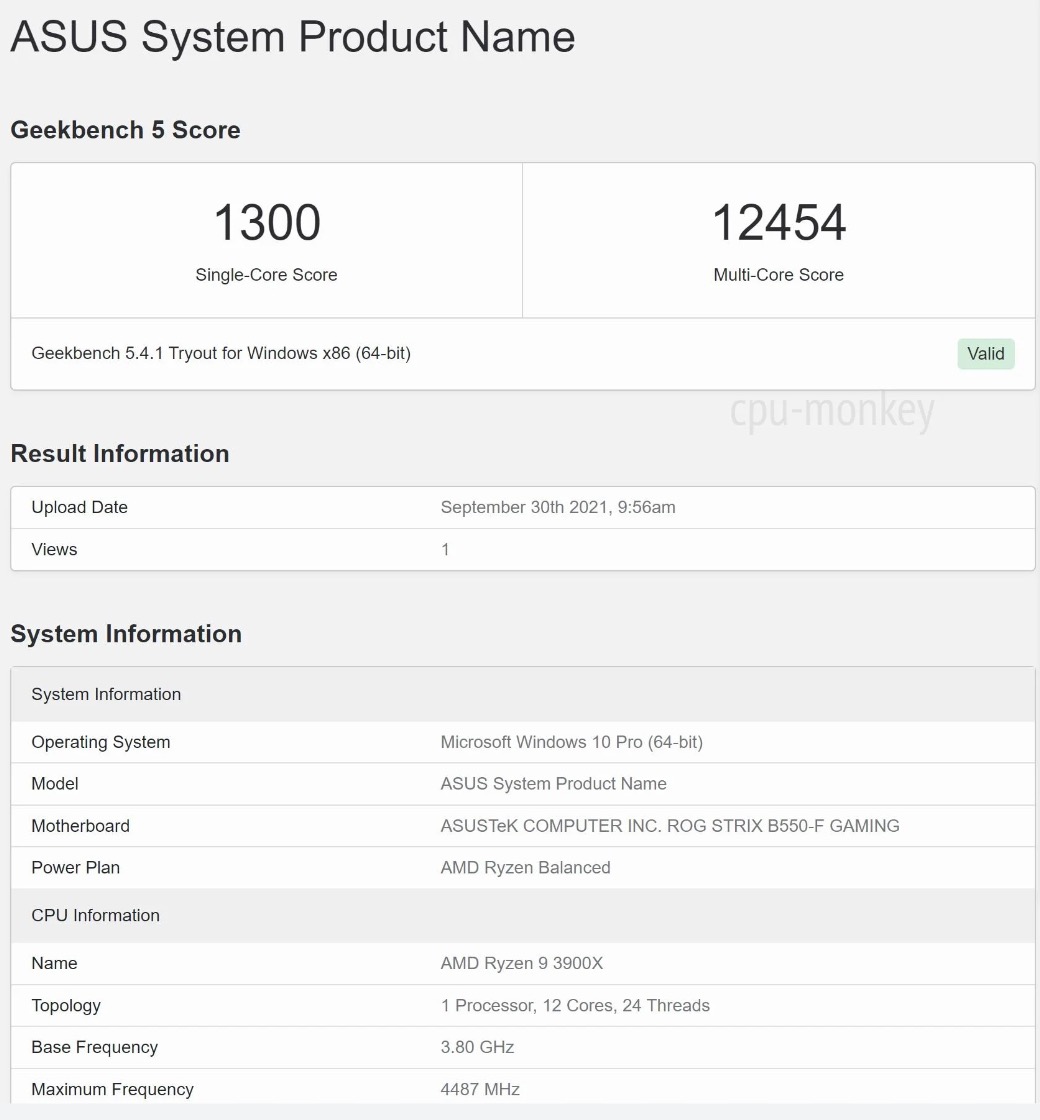
CPU Benchmark script for VPS
Execute benchmark testing automatically and show detailed results online.
Powered by Geekbench.
Works on Linux like Ubuntu, centOS, debian and etc.
Best for testing VPS, cloud server…
How to run
In the command line, paste the following and enter.
In the command line, paste the following and enter.
curl -L https://rebrand.ly/speed-cli | python3 -
Output:
Retrieving speedtest.net configuration...
Retrieving speedtest.net server list...
Testing from Comcast Cable (x.x.x.x)...
Selecting best server based on ping...
Hosted by FiberCloud, Inc (Seattle, WA) [12.03 km]: 44.028 ms
Testing download speed........................................
Download: 32.29 Mbit/s
Testing upload speed..........................................
Upload: 5.18 Mbit/s
🧰 Other Famous Benchmark & Testing Tools
🔧 General Benchmark Scripts
LemonBench – Comprehensive Benchmark Script
Supports CPU, memory, disk, network, and system information testing.
curl -fsL https://ilemonra.in/LemonBenchIntl | bash -s fast
SuperBench – Optimized for China Network
Suitable for testing speed from mainland China, disk I/O, and basic performance.
bash <(curl -Lso- https://git.io/superbench)
YABS (Yet Another Benchmark Script) – Minimalist Style
Quickly tests disk I/O, Geekbench scores, and network bandwidth.
curl -sL yabs.sh | bash
🌐 Network Performance Tools
Speedtest CLI – Official CLI Tool
Global speed test tool providing upload, download, and latency stats.
This document summarizes commonly used VPS performance testing scripts, covering CPU, disk, network, stress testing, and more. Works on Linux systems like Ubuntu/Debian/CentOS.
CPU Benchmark script for VPS
Execute benchmark testing automatically and show detailed results online.
Powered by Geekbench.
Works on Linux like Ubuntu, centOS, debian and etc.
Best for testing VPS, cloud server…
How to run
In the command line, paste the following and enter.
In the command line, paste the following and enter.
curl -L https://rebrand.ly/speed-cli | python3 -
Output:
Retrieving speedtest.net configuration...
Retrieving speedtest.net server list...
Testing from Comcast Cable (x.x.x.x)...
Selecting best server based on ping...
Hosted by FiberCloud, Inc (Seattle, WA) [12.03 km]: 44.028 ms
Testing download speed........................................
Download: 32.29 Mbit/s
Testing upload speed..........................................
Upload: 5.18 Mbit/s
🧰 Other Famous Benchmark & Testing Tools
🔧 General Benchmark Scripts
LemonBench – Comprehensive Benchmark Script
Supports CPU, memory, disk, network, and system information testing.
curl -fsL https://ilemonra.in/LemonBenchIntl | bash -s fast
SuperBench – Optimized for China Network
Suitable for testing speed from mainland China, disk I/O, and basic performance.
bash <(curl -Lso- https://git.io/superbench)
YABS (Yet Another Benchmark Script) – Minimalist Style
Quickly tests disk I/O, Geekbench scores, and network bandwidth.
curl -sL yabs.sh | bash
🌐 Network Performance Tools
Speedtest CLI – Official CLI Tool
Global speed test tool providing upload, download, and latency stats.
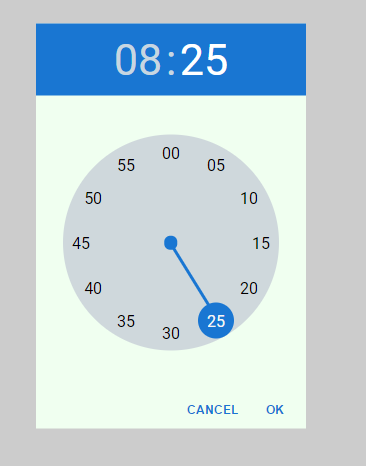
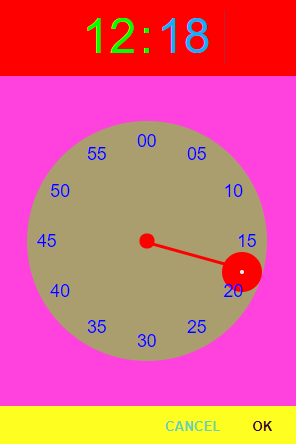
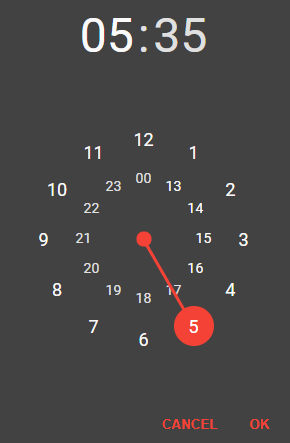
Material design timepicker written in Javascript (without any external dependencies – no jQuery, no Bootstrap, only one file!)
See https://grudus.github.io/Timepicker/ for more usage!
How it looks?
By default picker uses blue-white theme:
But you can change its colors by overriding some of default configuration:
Then, include index.css into your project (e.g. add
<link href="https://github.com/grudus/node_modules/grudus-timepicker/dist/index.css" rel="stylesheet" type="text/css"> into your html file)
And lastly, somewhere in your code put
importTimepickerfrom"path/to/grudus-timepicker/dist/grudus-timepicker.js";// ...Timepicker.showPicker({time: newDate(),onSubmit: (time)=>{//some action ...},headerColor: "#ff0000"// more color configuration ...})
You can set initial time by passing time field in argument. time may be a Date object, an object {hours: 12, minutes: 44} or a string in format HH:mm. If you want to learn more, visit customization section
this template variable will be substituted: {{variable}}
FETCH()
Download and extract remote resource:
FETCH( # use when source and target are the same
   url="http://server/package.tar.gz", # url for remote resource
   path="/common-path", # path inside the package source and image target
)
FETCH( # use when source and target are different
   url="http://server/package.tar.gz", # url for remote resource
   source="/package-path", # path inside the package extract
   target="/opt/resource", # path inside the build image target
)
RUN()
Invoke command, with target depending on the context:
This example uses the default alg and enc methods (RSA-OAEP and A128CBC-HS256). It requires an RSA key.
require'jwe'key=OpenSSL::PKey::RSA.generate(2048)payload="The quick brown fox jumps over the lazy dog."encrypted=JWE.encrypt(payload,key)putsencryptedplaintext=JWE.decrypt(encrypted,key)putsplaintext#"The quick brown fox jumps over the lazy dog."
This example uses a custom enc method:
require'jwe'key=OpenSSL::PKey::RSA.generate(2048)payload="The quick brown fox jumps over the lazy dog."encrypted=JWE.encrypt(payload,key,enc: 'A192GCM')putsencryptedplaintext=JWE.decrypt(encrypted,key)putsplaintext#"The quick brown fox jumps over the lazy dog."
This example uses the ‘dir’ alg method. It requires an encryption key of the correct size for the enc method
require'jwe'key=SecureRandom.random_bytes(32)payload="The quick brown fox jumps over the lazy dog."encrypted=JWE.encrypt(payload,key,alg: 'dir')putsencryptedplaintext=JWE.decrypt(encrypted,key)putsplaintext#"The quick brown fox jumps over the lazy dog."
This example uses the DEFLATE algorithm on the plaintext to reduce the result size.
require'jwe'key=OpenSSL::PKey::RSA.generate(2048)payload="The quick brown fox jumps over the lazy dog."encrypted=JWE.encrypt(payload,key,zip: 'DEF')putsencryptedplaintext=JWE.decrypt(encrypted,key)putsplaintext#"The quick brown fox jumps over the lazy dog."
This example sets an extra plaintext custom header.
require'jwe'key=OpenSSL::PKey::RSA.generate(2048)payload="The quick brown fox jumps over the lazy dog."# In this case we add a copyright line to the headers (it can be anything you like# just remember it is plaintext).encrypted=JWE.encrypt(payload,key,copyright: 'This is my stuff! All rights reserved')putsencrypted
Available Algorithms
The RFC 7518 JSON Web Algorithms (JWA) spec defines the algorithms for encryption
and key management to be supported by a JWE implementation.
Only a subset of these algorithms is implemented in this gem. Striked elements are not available:
Permission is hereby granted, free of charge, to any person obtaining
a copy of this software and associated documentation files (the
“Software”), to deal in the Software without restriction, including
without limitation the rights to use, copy, modify, merge, publish,
distribute, sublicense, and/or sell copies of the Software, and to
permit persons to whom the Software is furnished to do so, subject to
the following conditions:
The above copyright notice and this permission notice shall be
included in all copies or substantial portions of the Software.
THE SOFTWARE IS PROVIDED “AS IS”, WITHOUT WARRANTY OF ANY KIND,
EXPRESS OR IMPLIED, INCLUDING BUT NOT LIMITED TO THE WARRANTIES OF
MERCHANTABILITY, FITNESS FOR A PARTICULAR PURPOSE AND NONINFRINGEMENT.
IN NO EVENT SHALL THE AUTHORS OR COPYRIGHT HOLDERS BE LIABLE FOR ANY
CLAIM, DAMAGES OR OTHER LIABILITY, WHETHER IN AN ACTION OF CONTRACT,
TORT OR OTHERWISE, ARISING FROM, OUT OF OR IN CONNECTION WITH THE
SOFTWARE OR THE USE OR OTHER DEALINGS IN THE SOFTWARE.