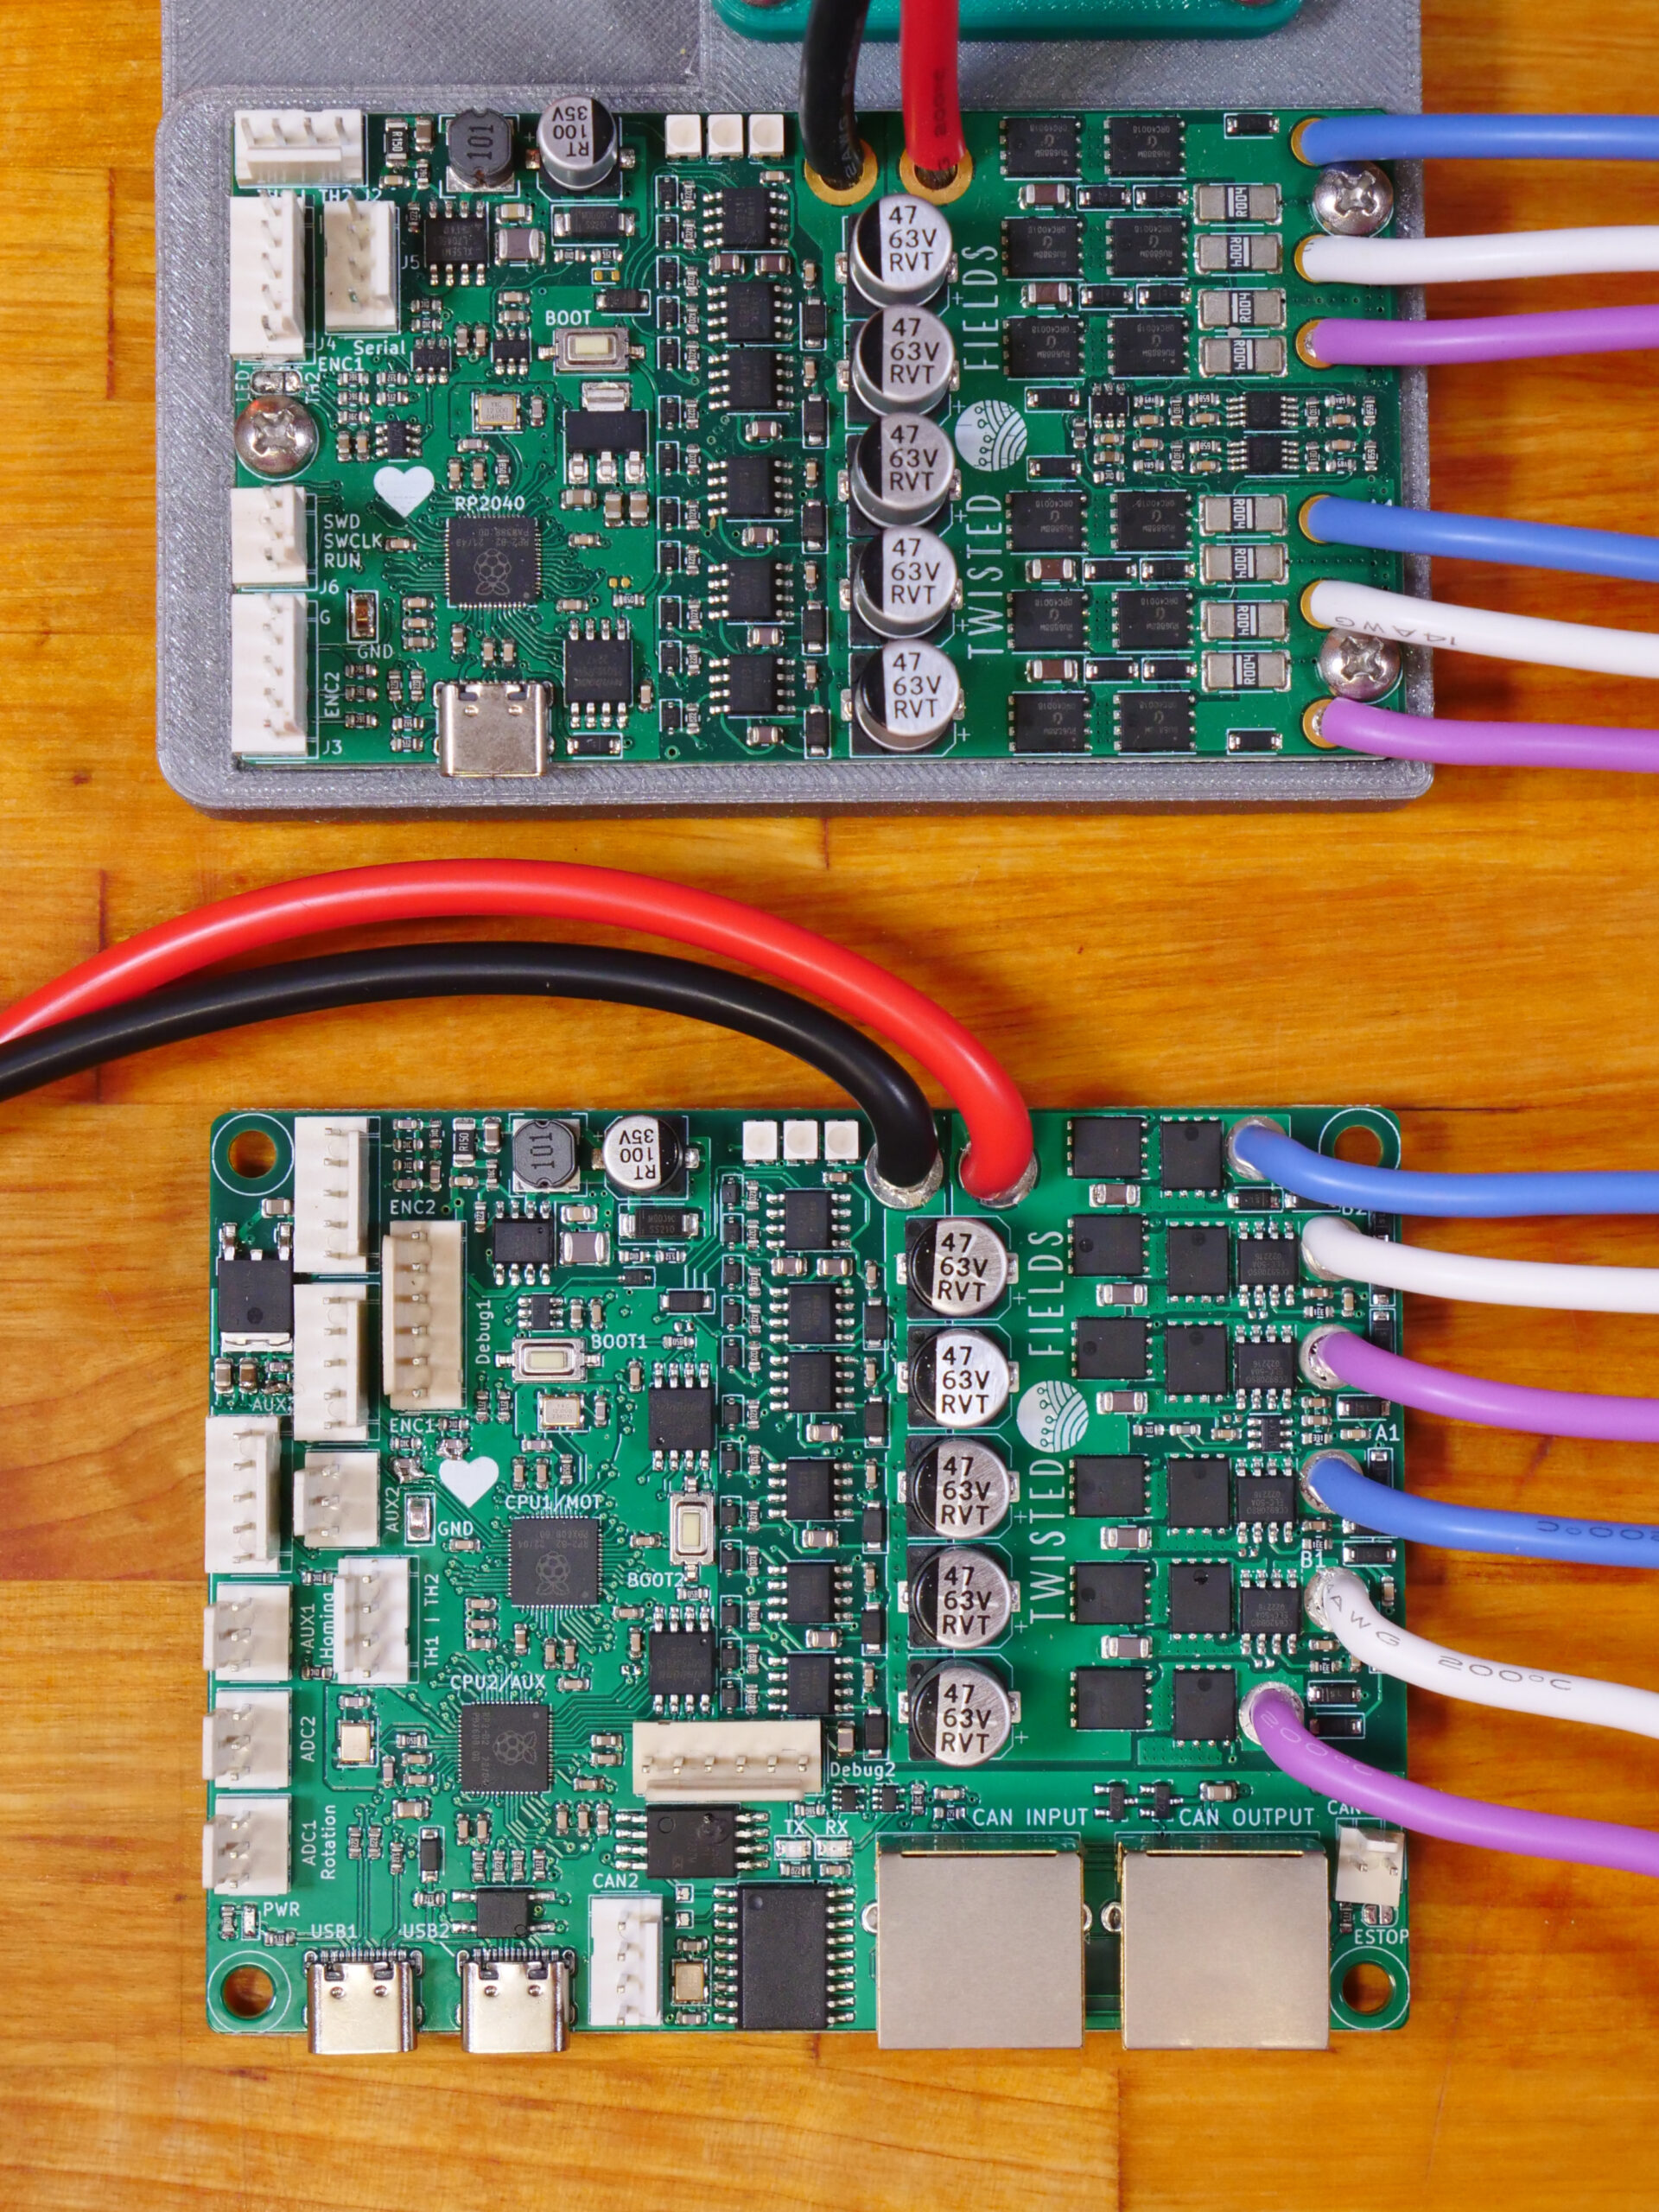
A dual channel brushless motor controller based on the RP2040 microcontroller
The boards cost between $15 and $40 each depending on version and quantity.
NOTE: This design is still changing. There is currently one board version in
this repo. This is our dual CPU version with CAN bus and extra connectors for
our robot. This version also improves the current measurement circuit compared
to the first rev.

Once we have verified the improved current measurement circuit, we will also
support a single CPU version which is smaller and slightly cheaper. This will
look similar to our first prototype version shown in the top of the photo at the
bottom of this document. To view the files for that board see this commit:
https://github.com/Twisted-Fields/rp2040-motor-controller/commit/ceeeb0ee0d24856a9ad8b6b036be5baf15e3ead6
Warning
These files are still under development and undergoing testing. While we do
aspire to produce a design that others can easily fabricate, we do not yet
recommend making them for yourself! Please post questions on board status
to our community forum at community.twistedfields.com.
Our dream is that you will fab your own boards, make changes, and share your work – giving this design life beyond our efforts.
Designed by Taylor Alexander for Twisted Fields, for the Acorn Precision Farming Rover.
Many thanks to Daniel Theobald. Without your financial support and encouragement this project would not have been possible.
Thanks to all of our supporters on Open Collective. Your contributions are helping grow this project in to a sustainable open source organization.
The following scripts will great two large files, one with a filesize that is even 512 blocks, the other is not. Compare the two MD5 hashs to confirm that the same file generated locally, sent to the tftp-server, then pulled back down is the same.
~$ cd test
~$ ./test-entrypoint.sh 1 100000

OK #1: Perfect Match
Concurrency Testing
This testing script will spawn off X number of calls to “./test-entrypoint.sh”
Parameters
./test.sh <# of concurrent clients>
Example
~$ cd test
~$ ./test.sh 5
Spawning 1
Spawning 2
Spawning 3
Spawning 4
Spawning 5

OK #1: Perfect Match
OK #2: Perfect Match
OK #3: Perfect Match
OK #4: Perfect Match
OK #5: Perfect Match
Scripting
This software supports exit-codes for errors resulting in abnormal execution:
Those events will be emitted by this client as well if they occur.
Internal events
The Mesos Operator API events slient itself emits the following events:
subscribed: Is emitted after a successful subscription to the Mesos Operator API.
unsubscribed: Is emitted after unsubscribe() is called.
reconciled: Is emitted after reconcile() is called. This queries the Operator API with a separate call to the GET_STATE method.
error: Is emitted in case of internal or upstream errors.
Using the client
Options
You can specify the following properties when instantiating the Mesos Operator API events client:
masterHost: The Mesos Master hostname (or ip address). Default is leader.mesos.
masterPort: The Mesos Master port. Default is 5050.
masterProtocol: The Mesos Operator API protocol (http or https). Default is http.
masterApiUri: The relative path where the Mesos Operator API endpoint can be found. Default is /api/v1.
masterConnectionTimeout: The time in milliseconds after which the connection to the Mesos Master is deemed as timed out. Default is 5000.
eventTypes: An array of event types emitted by the Mesos Master (see above for a list). Default is ["SUBSCRIBED", "TASK_ADDED", "TASK_UPDATED", "AGENT_ADDED", "AGENT_REMOVED"].
handlers: A map object consisting of handler functions for the individual Mesos Operator API events. See below for an explanation. No defaults.
Methods for events
The Mesos Operator API events client only exposes the subscribe() and the unsubscribe() methods. You can catch all above events via on(<eventType>, function (data) { ... }.
Supported methods for specific Operator API calls
The callback(error, data) function is optional, you need to add it only if you directly want to handle the results. Otherwise, those methods will trigger an event (starting with received_ appended by the lowercase method name, e.g. for GET_STATE is received_get_state), which applications can listen to to receive the responses in an asynchronous way.
getHealth(callback): This calls the GET_HEALTH method.
getFlags(callback): This calls the GET_FLAGS method.
getVersion(callback): This calls the GET_VERSION method.
getMetrics(callback): This calls the GET_METRICS method.
getLoggingLevel(callback): This calls the GET_LOGGING_LEVEL method.
getState(callback): This calls the GET_STATE method.
getAgents(callback): This calls the GET_AGENTS method.
getFrameworks(callback): This calls the GET_FRAMEWORKS method.
getExecutors(callback): This calls the GET_EXECUTORS method.
getTasks(callback): This calls the GET_TASKS method.
getRoles(callback): This calls the GET_ROLES method.
getWeights(callback): This calls the GET_WEIGHTS method.
getMaster(callback): This calls the GET_MASTER method.
getMaintenanceStatus(callback): This calls the GET_MAINTENANCE_STATUS method.
getMaintenanceSchedule(callback): This calls the GET_MAINTENANCE_SCHEDULE method.
getQuota(callback): This calls the GET_QUOTA method.
Event handler functions
The custom event handler functions can be configured by setting a map object as handlers property during the instantiation. Each map object’s property represents a event handling function. The property name needs to match on of the Marathon event types from the list of known Marathon events.
This is an example handlers map object:
{// Specify the custom event handlers"TASK_ADDED": function(data){console.log("We have a new TASK_ADDED event!");},"TASK_UPDATED": function(data){console.log("We have a new TASK_UPDATED event!");}}
"use strict";// Use the MesosOperatorApiClientconstMasterClient=require("mesos-operator-api-client").masterClient;// Create MesosOperatorApiClient instanceconsteventsClient=newMasterClient({masterHost: "172.17.11.101"// Replace with your Mesos Leader hostname or ip address});// Wait for "subscribed" eventeventsClient.on("subscribed",function(){console.log("Subscribed to the Mesos Operator API events!");// Call GET_AGENTSeventsClient.getAgents(function(err,data){console.log("Got result for GET_AGENTS");console.log(JSON.stringify(data));});// Do a reconcile after 3000ms. Demo!setTimeout(function(){eventsClient.reconcile();},3000);});// Wait for "unsubscribed" eventeventsClient.on("unsubscribed",function(){console.log("Unsubscribed from the Mesos Operator API events!");});// Catch error eventseventsClient.on("error",function(errorObj){console.log("Got an error");console.log(JSON.stringify(errorObj));});// Log SUBSCRIBED eventeventsClient.on("SUBSCRIBED",function(eventObj){console.log("Got SUBSCRIBED");console.log(JSON.stringify(eventObj));});// Log TASK_ADDED eventeventsClient.on("TASK_ADDED",function(eventObj){console.log("Got TASK_ADDED");console.log(JSON.stringify(eventObj));});// Log TASK_UPDATED eventeventsClient.on("TASK_UPDATED",function(eventObj){console.log("Got TASK_UPDATED");console.log(JSON.stringify(eventObj));});// Log AGENT_ADDED eventeventsClient.on("AGENT_ADDED",function(eventObj){console.log("Got AGENT_ADDED");console.log(JSON.stringify(eventObj));});// Log AGENT_REMOVED eventeventsClient.on("AGENT_REMOVED",function(eventObj){console.log("Got AGENT_REMOVED");console.log(JSON.stringify(eventObj));});// Subscribe to Mesos Operator API eventseventsClient.subscribe();// Unsubscribe after 10sec. Demo!setTimeout(function(){eventsClient.unsubscribe();},10000);
Agent client
Using the client
Options
You can specify the following properties when instantiating the Mesos Operator API events client:
agentHost: The Mesos Agent hostname (or ip address). Default is 127.0.0.1.
agentPort: The Mesos Agent port. Default is 5051.
agentProtocol: The Mesos Operator API protocol (http or https). Default is http.
agentApiUri: The relative path where the Mesos Operator API endpoint can be found. Default is /api/v1.
agentConnectionTimeout: The time in milliseconds after which the connection to the Mesos Agent is deemed as timed out. Default is 5000.
"use strict";// Use the agentClientconstAgentClient=require("mesos-operator-api-client").agentClient;// Create agentClient instanceconstagent=newAgentClient({agentHost: "172.17.11.102"});// Call GET_HEALTHagent.getHealth(function(err,data){console.log(JSON.stringify(data));});
Supported methods for specific Operator API calls
The callback(error, data) function is optional, you need to add it only if you directly want to handle the results. Otherwise, those methods will trigger an event (starting with received_ appended by the lowercase method name, e.g. for GET_STATE is received_get_state), which applications can listen to to receive the responses in an asynchronous way.
getHealth(callback): This calls the GET_HEALTH method.
getFlags(callback): This calls the GET_FLAGS method.
getVersion(callback): This calls the GET_VERSION method.
getMetrics(callback): This calls the GET_METRICS method.
getState(callback): This calls the GET_STATE method.
getContainers(callback): This calls the GET_CONTAINERS method.
getFrameworks(callback): This calls the GET_FRAMEWORKS method.
getExecutors(callback): This calls the GET_EXECUTORS method.
getTasks(callback): This calls the GET_TASKS method.
getAgent(callback): This calls the GET_AGENT method.
Asynchronous bot for Telegram messaging app utilizing a SAP (Sybase) SQL Anywhere RDMS and Computer Vision elements. It’s implied that a machine this bot runs on is connected to a webcam and has got a SAP SQL Anywhere 17 database running. The bot is able to send its users specific messages based on a QR-code the webcam captures from its live video feed.
This particular code simulates delivery notification system but via an instant messenger (Telegram), not e-mail. For the details, please see the comment block at the beginning of main.py file.
We also tried to thoroughly document the source code, so feel free to browse it.
Main Features
Asynchronous HTTP requests
Detection and decoding QR-codes on the fly
Detailed and customizable logging system
Scalability and low imprint on hardware
Easily repurposable for different tasks involving QR-codes.
It also got hosted as a sample under the official SAP Samples repository. Main development has been moved there.
Installation
The full installation process consists of several steps involving different pieces of software. There’s nothing complicated, but we’ll try to go through this process step-by-step, explaining it as clearly as possible, so hopefully you’ll end up with a minimal working example.
Disclaimer
This is merely an example of a possible technical integration of SAP SQL Anywhere RDMS into a Python-based project. The code of this particular sample heavily relies on Telegram messaging app and its Bot API to function properly. By proceeding, running and using the sample’s code, the user becomes
You’ll need to know your Telegram ID to store it in the database, so later the bot will be able to send you notifications. Your Telegram ID is just an integer, the quickest way to acquire it is via @MyIDBot: open it in your Telegram app, start it and send it the /getid command. It should reply with your ID (say, 123456789).
You should also create your own Telegram bot. To do that, search for the @BotFather Telegram bot and enter the /newbot command to create a new bot. Follow the instructions and provide a screen-name and a username for your bot. The username must, however, be unique and end with “bot”; the screen-name can be whatever you like. You should then receive a message with a new API token generated for your bot (say, 11111:XXXXXXXXXXX). Now you can find your newly created bot on Telegram based on the username you gave it.
QR-coding the address
The bot interprets QR-codes on the webcam feed as encoded addresses in our model. Let’s turn an address into a QR-code and print it, so we can show it to the webcam later. The QR-code below encodes WDF 01 BU04 Dietmar-Hopp-Allee 16 69190 Walldorf:
You can download it by clicking it and print it on a white sheet of paper or just open it on your smartphone. Alternatively, you may encode your preferred address online.
Preparing the Database
Now when you’ve got every piece of data, you can create a database and fill all required columns. First, create an additional folder (in this case, named db) inside this project’s root folder:
mkdir db
Create a database file using dbinit (in this case, named orders.db; admin as UID and YourPassword as password (change it, it’s just an example)):
Now you’ve got a database file orders.db located in the db folder of this project (you may store this database file wherever you’d like). Open SQL Central and proceed with the following steps:
right-click on “SQL Anywhere 17” and hit “Connect…”,
fill the “User ID” and “Password” fields with the same values you provided to dbinit (in this case, admin and YourPassword respectively),
under “Action” choose “Start and connect to a database on this computer”,
provide full path to the database file you’ve just created (in this case, it’s full/path/to/this/project/db/orders.db) and hit “Connect”.
You’re connected to the SQL Anywhere database and can interact with it. Right-click anywhere to open the Interactive SQL window, so you may execute SQL queries in the database.
First, create a table of orders (in our case, named Orders):
CREATETABLEOrders (
id UNSIGNED INTPRIMARY KEYNOT NULL IDENTITY,
product NVARCHAR(24) NOT NULL,
model NVARCHAR(20),
price DECIMAL(10,2) NOT NULL,
amount UNSIGNED INTNOT NULL DEFAULT 1,
weight DECIMAL(8,3) NOT NULL,
first_name NVARCHAR(16) NOT NULL,
last_name NVARCHAR(20),
address NVARCHAR(48) NOT NULL,
telegram_id UNSIGNED INTNOT NULL,
timezone NVARCHAR(16) DEFAULT 'UTC',
locale NVARCHAR(5) DEFAULT 'en_US'
);
Then you can add an example order record to test the bot:
where WDF 01 BU04 Dietmar-Hopp-Allee 16 69190 Walldorf is the address encoded in the QR-code you printed by following the “QR-coding the address” section, and 123456789 is your Telegram ID sent by @MyIDBot from the “Getting Telegram-related Data” section. Obviously, you may customize other values however you like.
Make sure to close the Interactive SQL window afterwards, as it blocks query execution from any other source.
Setting the Environment Variables
For the sake of convenience we store all required environment variables in a .env file. This repository contains a .env.dist file filled with dummy data in the root folder, so you’ll need to copy it to .env file and change its values, as it’s currently preset to the example values.
You’ll absolutely have to set the PROD_BOT_TOKEN variable to the API token sent to you by @BotFather, so it looks like this: PROD_BOT_TOKEN="11111:XXXXXXXXXXX".
The sqlanydb module also requires the SQLANY_API_DLL variable to be set to the full path of dbcapi.dll. Unfortunately, SQL Anywhere doesn’t create this variable automatically upon installation anymore, hence you have to specify it manually. On Windows this path is usually C:\Program Files\SQL Anywhere 17\Bin64\dbcapi.dll. However, if you run the 32-bit version of Python, you should change Bin64 to Bin32 in the path above.
So, if you’re using the 64-bit version of Python on Windows and all our example values, the variables inside your .env file should end up looking like this:
You may also set the DEV variables using different values meant for testing, if you’re going to run the bot with the --dev flag.
Running and Testing Bot
Make sure that you still have the virtual environment activated, the QR-code printed, your webcam connected and the SQL Anywhere database connection established. Start the bot by running
python main.py
in the project’s root directory. After the Updates were skipped successfully log message, a window with your webcam’s video stream should appear. Search for the bot you’ve created with @BotFather and start it. If everything is right, the bot should respond by offering you to select the language.
So now, whenever you show the QR-code encoding your address to your webcam, the bot should alert you with a notification. With the example record from our table, the notification should look like this:
Hello, Jon!

As of 25/10/2020 18:47:19 CET, your order 1 has arrived to our base.
We are going to deliver it to your address "WDF 01 BU04 Dietmar-Hopp-Allee 16 69190 Walldorf" no later than in 3 days.

Product Details:
Product: Lenovo Thinkpad
Model: X220
Price: €150.00
Amount: 1
Weight: 1.725 kg
ID: 1
You may configure the camera UI via the CLI arguments. To see all configurable options of the bot, run python main.py --help.
Contributing
If you’d like to contribute to this little project, please follow these steps:
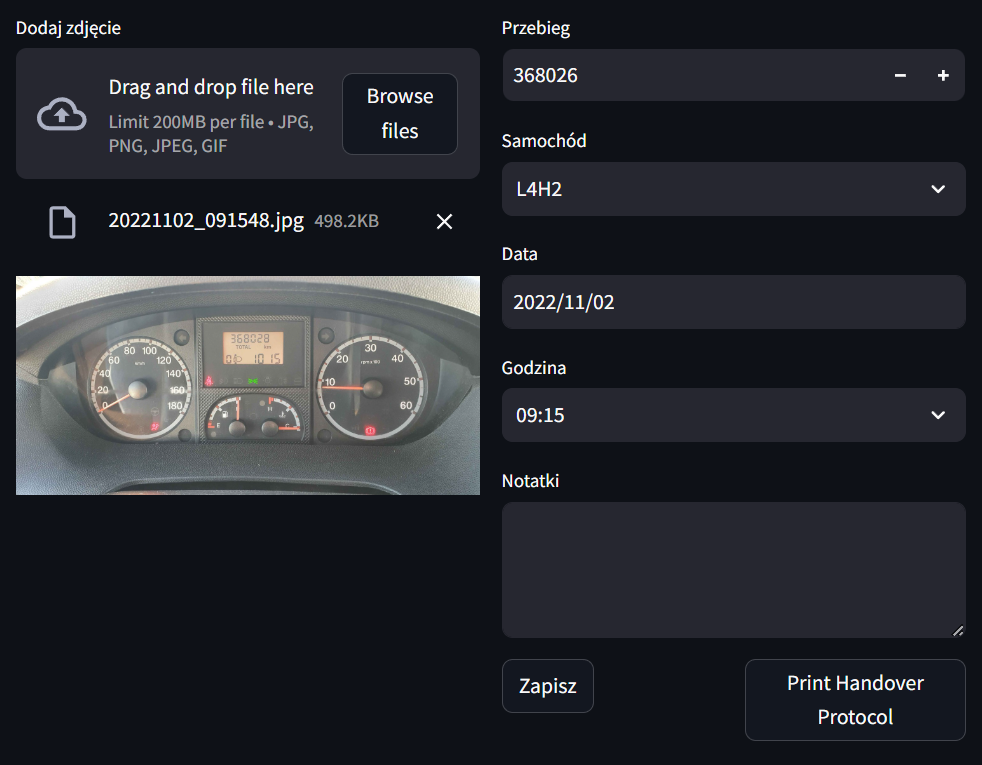
Managing a car rental business requires meticulous documentation. Each vehicle handover involves:
Verifying current mileage
Identifying the vehicle
Recording date and time
Filling, signing and archiving protocols
When done manually, this process is time-consuming and error-prone.
App is working on authentic data for a Polish car rental business. Because of that, some elements are named in Polish language.
This is a portfolio README focused on business problem solving. Technical README with setup instructions and project structure is available in modules/README.md.
Solution
RentML automates car rental management processes:
Key Features:
Automated Data Recognition
Dashboard image analysis
Vehicle model identification
Mileage reading with OCR
Smart Prediction
System suggests vehicle model based on historical data
Auto-filled forms save time
Document Generation
Instant handover protocol creation
Print-ready format (DOCX)
Easily adjustable template
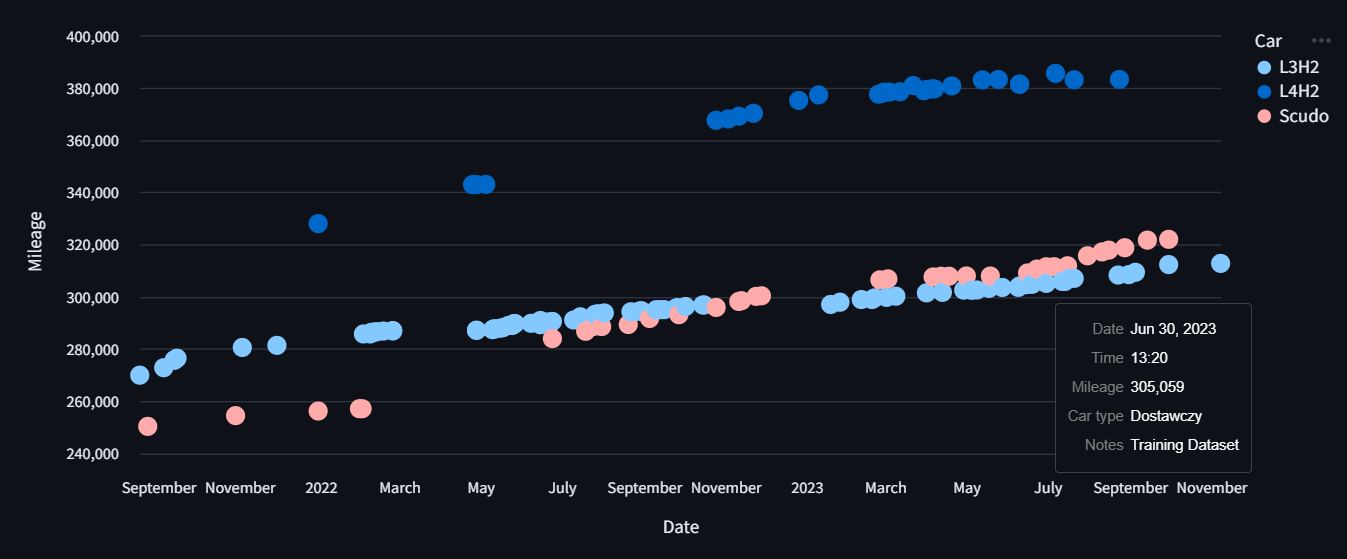
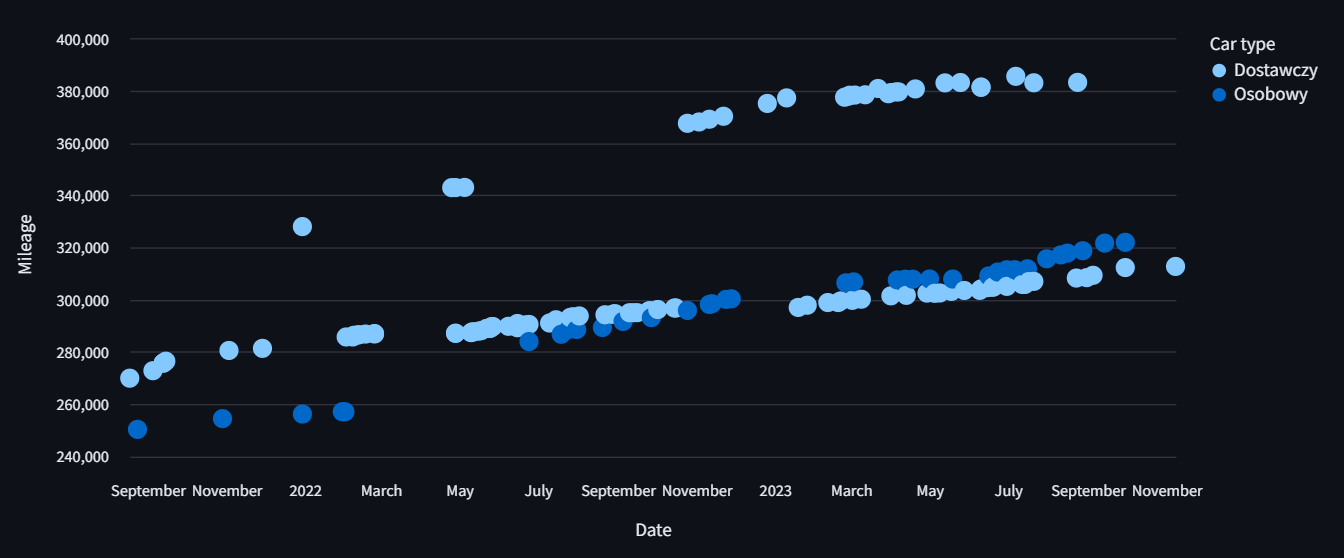
Data Visualization
Interactive mileage charts
Fleet usage trend analysis
Benefits
Time Saving: Registration process reduced from minutes to seconds
Easy Data Access: Mileage history and usage always available
Mobility: Register directly from mobile device
How It Works
Take a dashboard photo or upload existing one
System automatically recognizes model and mileage
Verify and complete data in the form
Save to database and/or generate protocol
Tech Stack
Python: Core programming language
PyTorch: Binary classification model trained for dashboard recognition
EasyOCR: Optical Character Recognition for mileage reading
Pandas: Data manipulation and analysis
Altair: Interactive data visualization
Streamlit: Web application interface
SKLearn: Data clustering
Challenges Faced
Dashboard Similarity: Two delivery vehicles had identical dashboards, making trained ML model classification insufficient
Clustering Solution: Implemented a clustering approach to differentiate between similar dashboard types
OCR Quality: The dataset wasn’t created with OCR in mind. Extremely poor outliers were removed, and while some reading fluctuations remain (shouldn’t happen while measuring car mileage increase over time), the results were deemed acceptable for practical use.
Recognized by ML model
Clustered
Project created by Mateusz Ratajczak as a post-mortem automation of own business.
This is the official PyTorch implementation of “Text-Guided Synthesis of Eulerian Cinemagraphs”.
Method Details
We introduce a fully automated method, Text2Cinemagraph, for creating cinemagraphs from text descriptions – an especially challenging task when prompts feature imaginary elements and artistic styles, given the complexity of interpreting the semantics and motions of these images. In this method, we propose an idea of synthesizing image twins from a single text prompt using Stable Diffusion – a pair of an artistic image and its pixel-aligned corresponding natural-looking twin. While the artistic image depicts the style and appearance detailed in our text prompt, the realistic counterpart greatly simplifies layout and motion analysis. Leveraging existing natural image and video datasets, we accurately segment the realistic image and predict plausible motion given the semantic information. The predicted motion is then transferred to the artistic image to create the final cinemagraph.
Getting Started
Environment Setup
Run the following commands to set up the dependencies reqiured for this project.
If there are ninja related errors in installing mask2former refer to this link
Download Pretrained Models
Run the following command to download the preatrined (Optical Flow Prediction, Text-Direction Guided Optical Flow Prediction, Video Generation) models,
gdown https://drive.google.com/u/4/uc?id=1Cx64SC12wXzDjg8U0ujnKx8V2G6SbCIb&export=download
tar -xvf checkpoints.tar
Download sd-v1-4-full-ema.ckpt using,
mkdir -p img2img/models/ldm/stable-diffusion-v1
cd img2img/models/ldm/stable-diffusion-v1
wget https://huggingface.co/CompVis/stable-diffusion-v-1-4-original/resolve/main/sd-v1-4-full-ema.ckpt
cd ../../../../
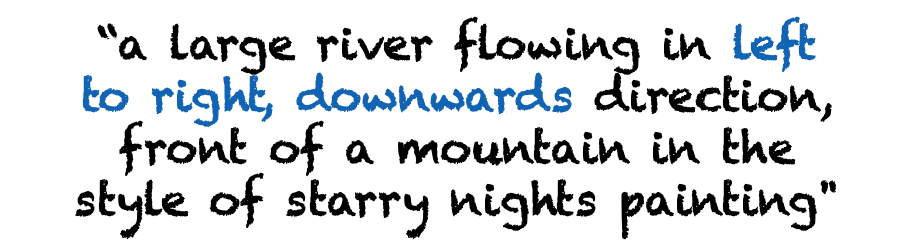
To generate the text guided direction result displayed above, run the following command,
#to generate the left example
python inference_t2c.py \
--config configs/inference_directional.yaml \
--use_hint \
--prompt "a large river flowing in left to right, downwards direction in front of a mountain in the style of starry nights painting"
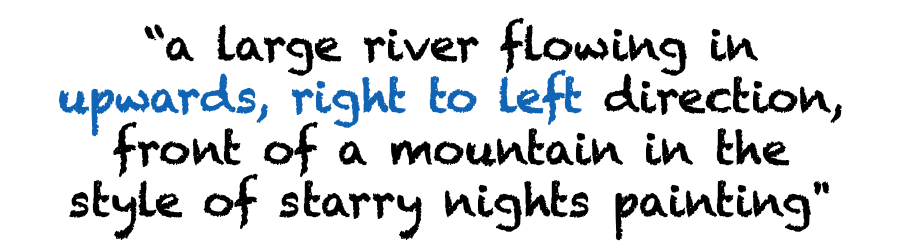
#to generate the right example
python inference_t2c.py \
--config configs/inference_directional.yaml \
--use_hint \
--prompt "a large river flowing in upwards, right to left direction in front of a mountain in the style of starry nights painting"
Note that since we randomly sample a theta based on quadrant which the text direction corresponds to, exact replicability might not be possible.
Artistic Image (s1)
Natural Image (s21)
ODISE Mask (s3)
Self-Attention Mask (s4)
Optical Flow (s5)
Cinemagraph (s6)
Since the total time needed to run all the components might be large and the user might not be satisfied with the end result due to output of some intermediate compont, we suggest the user to run each component separately in such scenario. Below we show how to run inference in a stage-wise manner,
Tip and Tricks for achieving better results (Artistic Domain) Change the following parameters in inference.yaml or inference_directional.yaml if you do not achieve desired results,
twin_extraction:prompt: change the input text prompt if the images generated by --stage s1 are not desirable.
twin_extraction:seed: change the seed if the images generated by --stage s1 are not desirable and the user does not want to change the prompt.
twin_generation:prompt: by default it can be None. If the output of --stage s2 does not look semantically similar to the artistic image, try spacifying the edit prompt manually.
odise:vocab: if the ODISE generated mask is including some regions that the user does not want, change the vocab to specify only the desired regions.
attn_mask:n_clusters: change the number of clusters if the generated mask from --stage s4 is not representative of the desired regions of motion in the final cinemagraph.
attn_mask:threshold: it specifies what is the minimum percentage of pixel overlap between the ODISE mask and the Self-Attention cluster to be considered inside the mask. Increase the value to reduce the amount of Self-Attention clusters included in the final mask and vice versa.
attn_mask:cluster_type: change the cluster type between kmeans or spectral (this is only for very fine-grained refinement).
attn_mask:erosion_iter: if the mask is slightly overlaping with boundaries of static region in --stage s4 increase the value of erosion_iter between [2,5] at intervals of 1 to retract the mask slightly.
video:n_frames: use 60 in cases of motion restricted to small regions (like waterfall) and 120 for large body motion (like sea).
video:speed: change the speed (recommended value between [0.25, 3]) to change the speed of motion in the generated cinemagraph. If the user notices grey rigions apprearing in the cienmagraph, try lowering the speed.
gdown https://drive.google.com/u/0/uc?id=19f2PsKEaeAmspd1ceGkOEMhZsZNquZyF&export=download
cd dataset
unzip eulerian_data.zip
Note that we use the entire validation dataset as test dataset (and do not use it during training process).
Masks (ODISE)
For testing on real-domain data, we use masks generated by ODISE. To generate the masks (after completing the above step), run the following command,
python demo/gen_mask.py \
          --input dataset/eulerian_data/validation \
          --output dataset/eulerian_data/validation_masks_odise \
          --vocab "water, waterfall, river, ocean, lake, sea"
Text Guided Direction Control
For training the optical flow prediction model that can predict flow following the direction of motion in the input prompt, we generate optical dense flow hint maps, similar to Controllable Animation of Fluid Elements in Still Images. The optical flow hints are generated from Ground-Truth optical flow with 1,2,3,4 and 5 hints. The code for generating hints is taken from SLR-SFS.
The prompts used to generate artistic domain examples are located in dataset/prompts.txt and the corresponding edit prompts (used to generate the natural verion of the artistic images) are located in dataset/prompts_twin.txt.
Note that the edit prompts can be specified manually or can also be atumatically derived from the artistic prompts if not specified otherwise.
Training
Optical Flow Prediction
For training the optical flow prediction model, that predicts optical flow without taking text direction guidance, use the following command,
Note that in addition to the input image and mask, we condition the flow prediction on text prompt. We generate the text prompts for the images in the train and validation dataset using BLIP2.
Optical Flow Prediction (for text guidance direction)
For training the optical flow prediction model, that predicts optical flow conditioned on text direction guidance, use the following command,
Note that in our experiments, for predicting optical flow conditioned on text direction guidance, we do not use text conditoning by Cross-Attention layers, as the input consists of the image, mask and dense optical flow hint. The motivation for using text conditioning along with image and mask in previous method was that text inherently contains class information, like a ‘waterfall’ or ‘river’, which can be useful to determine the natural direction in the predicted flow. However, in this case direction is already given as input dense flow hint. This helps in reducing the model size (as we do not need to use expensive Cross-Attention layers).
Video Generation
For first stage training (training using Ground-Truth Optical Flow) of the video generation model, use the following command,
We train the flow perdiction model additionally for 50 epochs on optical flow predicted by the Optical Flow Prediction model. To make the training process more efficient, we precompute and store all the optical flow predictions for training data before starting training. To generate the optical flow using the Optical Flow Prediction model use the following command,
Note that we use the Video Generation model, trained with Optical Flow Prediction model (w/o using text direction guidance) to generate videos for both the scenarios, i.e., w/ and w/o text direction guidance.
Evaluation (Real Domain)
Generate Results
To predict Optical Flow for the validation dataset on single images, use the following command,
The code for FVD computation has been taken from StyleGAN-V.
Citation
@article{mahapatra2023synthesizing,
    title={Text-Guided Synthesis of Eulerian Cinemagraphs},
    author={Mahapatra, Aniruddha and Siarohin, Aliaksandr and Lee, Hsin-Ying and Tulyakov, Sergey and Zhu, Jun-Yan},
    journal={arXiv preprint arXiv:2307.03190},
    year={2023}
}
Acknowledgments
The code for this project was built using the codebase of pix2pixHD, ODISE, plug-and-play, SLR-SFS. The symmetric-splatting code was built on top of softmax-splatting. The code for evalution metric (FVD) was build on codebase of StyleGAN-V. We are very thankful to the authors of the corresponding works for releasing their code.
We are also grateful to Nupur Kumari, Gaurav Parmar, Or Patashnik, Songwei Ge, Sheng-Yu Wang, Chonghyuk (Andrew) Song, Daohan (Fred) Lu, Richard Zhang, and Phillip Isola for fruitful discussions. This work is partly supported by Snap Inc. and was partly done while Aniruddha was an intern at Snap Inc.


 https://github.com/Twisted-Fields/rp2040-motor-controller