Easy tool to draw and export the result in several formats using ogr2ogr.
Configuration
Create config.yml file in root directory.
PostgreSQL
PostgreSQL is used to validate the geometry. You’ll need to specify the configuration to connect to the database with PostGIS extension enabled.
Export formats
The application allows you to export the geometry in several formats. Those formats are the format produced by ogr2ogr. You can find the list here : http://www.gdal.org/ogr_formats.html.
To add a format in the resulting ZIP file, you just have to add it (according to the code defined by “OGR Vector Formats”) in the configuration file.
If you want to export the geometry with several Spatial Reference Systems (SRS), you just have to specify it in the configuration file (as long as the format allows it, KML is always in EPSG:4326). You can find more information about SRS here : https://epsg.io/.
Проект состоит из двух частей – голосовой бот и RESTful сервер для взаимодействия с ним.
Для запуска бота локально нужно выполнить python3 bot.py (или run_bot.sh) и в предложенном меню выбрать желаемый вариант работы (подробнее тут).
Для запуска RESTful сервера, предоставляющего интерфейс для взаимодействия с модулями голосового бота, нужно выполнить python3 rest_server.py (или run_rest_server.sh) (подробнее тут).
Для сборки docker-образа на основе RESTful сервера выполните sudo docker build -t voice_chatbot:0.1 . (подробнее тут).
ВНИМАНИЕ! Это был мой дипломный проект, по этому архитектура и код тут не очень хорошие, я это понимаю и как появится время – всё обновлю.
Зависимости
Полный список всех необходимых для работы зависимостей:
Данные для обучения и готовые модели: необходимо вручную загрузить из Google Drive архив Voice_ChatBot_data.zip(3Gb) и распаковать в корень проекта (папки data и install_files).
Если вы используете Ubuntu 16.04 или выше, для установки всех пакетов можно воспользоваться install_packages.sh (проверено в Ubuntu 16.04 и 18.04). По умолчанию будет установлен TensorFlow для CPU. Если у вас есть видеокарта nvidia с утановленным официальным драйвером версии 410, вы можете установить TensorFlowGPU. Для этого необходимо при запуске install_packages.sh передать параметр gpu. Например:
./install_packages.sh gpu
В этом случае из моего Google Drive будет загружено 2 архива:
Install_CUDA10.0_cuDNN_for410.zip(2.0Gb) с CUDA 10.0 и cuDNN 7.5.0 (если был передан параметр gpu). Установка будет выполнена автоматически, но если что-то пошло не так, есть инструкция Install.txt в загруженном архиве.
Voice_ChatBot_data.zip(3Gb) с данными для обучения и готовыми моделями. Он будет автоматически распакован в папки data и install_files в корне проекта.
Если вы не можете или не хотите воспользоваться скриптом для установки всех необходимых пакетов, нужно вручную установить RHVoice и CMUclmtk_v0.7, используя инструкции в install_files/Install RHVoice.txt и install_files/Install CMUclmtk.txt. Так же необходимо скопировать файлы языковой, акустической модели и словаря для PocketSphinx из temp/ в /usr/local/lib/python3.6/dist-packages/pocketsphinx/model (у вас путь к python3.6 может отличаться). Файлы языковой модели prepared_questions_plays_ru.lm и словаря prepared_questions_plays_ru.dic необходимо переименовать в ru_bot_plays_ru.lm и ru_bot_plays_ru.dic (либо изменить их название в speech_to_text.py, если у вас есть своя языковая модель и словарь).
Бот
Основа бота – рекуррентная нейронная сеть, модель AttentionSeq2Seq. В текущей реализации она состоит из 2 двунаправленных LSTM ячеек в кодировщике, слоя внимания и 2 LSTM ячеек в декодировщике. Использование модели внимания позволяет установить “мягкое” соответствие между входными и выходными последовательностями, что повышает качество и производительность. Размерность входа в последней конфигурации равна 500 и длина последовательности 26 (т.е. максимальная длина предложений в обучающей выборке). Слова переводятся в вектора с помощью кодировщика word2vec (со словарём на 445.000 слов) из бибилотеки gensim. Модель seq2seq реализована с помощью Keras и RecurrentShop. Обученная модель seq2seq (веса которой находятся в data/plays_ru/model_weights_plays_ru.h5) с параметрами, которые указаны в исходных файлах, имеет точность 99.19% (т.е. бот ответит на 1577 из 1601 вопросов правильно).
На данный момент предусмотрено 3 набора данных для обучения бота: 1601 пара вопрос-ответ из различных пьес (data/plays_ru), 136.000 пар из различных произведений (data/conversations_ru, спасибо NLP Datasets) и 2.500.000 пар из субтитров к 347 сериалам (data/subtitles_ru, подробнее в Russian subtitles dataset). Модели word2vec обучены для всех наборов данных, но нейронная сеть обучена только на наборе данных из пьес.
Обучение модели word2vec и нейронной сети на наборе данных из пьес без изменения параметров длится примерно 7.5 часов на nvidia gtx1070 и intel core i7. Обучение на наборах данных из произведений и субтитров на данном железе будет длиться минимум нескольких суток.
Бот умеет работать в нескольких режимах:
Обучение модели seq2seq.
Работа с обученной моделью seq2seq в текстовом режиме.
Работа с обученной моделью seq2seq с озвучиванием ответов с помощью RHVoice.
Работа с обученной моделью seq2seq с распознаванием речи с помощью PocketSphinx.
Работа с обученной моделью seq2seq с озвучиванием ответов и распознаванием речи.
1. Обучение модели seq2seq
Обучающая выборка состоит из 1600 пар вопрос %% ответ, взятых из различных русских пьес. Она хранится в файле data/plays_ru/plays_ru.txt. Каждая пара вопрос %% ответ пишется с новой строки, т.е. на одной строке только одна пара.
Все необходимые для обучения этапы выполняются методами prepare() или load_prepared() и train() класса TextToText из модуля text_to_text.py и метод build_language_model() класса LanguageModel из модуля preparing_speech_to_text.py. Или можно использовать функцию train() модуля bot.py.
Для запуска бота в режиме обучения нужно запустить bot.py с параметром train. Например, так:
python3 bot.py train
Или можно просто запустить bot.py (или выполнить run_bot.sh) и в предложенном меню выбрать режим 1 и 1.
Процесс обучения состоит из нескольких этапов:
1. Подготовка обучающей выборки.
Для подготовки обучающей выборки предназначен модуль source_to_prepared.py, состоящий из класса SourceToPrepared. Данный класс считывает обучающую выборку из файла, разделяет вопросы и ответы, удаляет неподдерживаемые символы и знаки препинания, преобразует полученные вопросы и ответы в последовательности фиксированного размера (с помощью слов-наполнителей <PAD>). Так же этот класс осуществляет подготовку вопросов к сети и обработку её ответов. Например:
Вход: "Зачем нужен этот класс? %% Для подготовки данных"
Обучающая выборка считывается из файла data/plays_ru/plays_ru.txt, преобразованные пары [вопрос,ответ] сохраняются в файл data/plays_ru/prepared_plays_ru.pkl. Так же при этом строится гистограмма размеров вопросов и ответов, которая сохраняется в data/plays_ru/histogram_of_sizes_sentences_plays_ru.png.
Для подготовки обучающей выборки из набора данных на основе пьес достаточно передать методу prepare_all() имя соответствующего файла. Что бы подготовить обучающую выборку из набора данных на основе произведений или субтитров, нужно вначале вызвать combine_conversations() или combine_subtitles(), а после вызывать preapre_all().
2. Перевод слов в вещественные вектора.
За этот этап отвечает модуль word_to_vec.py, состоящий из класса WordToVec. Данный класс кодирует последовательности фиксированного размера (т.е. наши вопросы и ответы) в вещественные вектора. Использутся кодировщик word2vec из библиотеки gensim. В классе реализованы методы для кодирования сразу всех пар [вопрос,ответ] из обучающей выборки в вектора, а так же для кодирования вопроса к сети и декодирования её ответа. Например:
Выход: [[[0.43271607, 0.52814275, 0.6504923, ...], [0.43271607, 0.52814275, 0.6504923, ...], ...], [[0.5464854, 1.01612, 0.15063584, ...], [0.88263285, 0.62758327, 0.6659863, ...], ...]] (т.е. каждое слово кодируется вектором с длинной 500 (это значение можно изменить, аргумент size в методе build_word2vec()))
Пары [вопрос,ответ] считываются из файла data/plays_ru/prepared_plays_ru.pkl (который был получен на предыдущем этапе, для расширения и повышения качества модели рекомендуется дополнительно передать методу build_word2vec() предобработанный набор данных из субтитров data/subtitles_ru/prepared_subtitles_ru.pkl), закодированные пары сохраняются в файл data/plays_ru/encoded_plays_ru.npz. Так же в процессе работы строится список всех используемых слов, т.е. словарь, который сохраняется в файле data/plays_ru/w2v_vocabulary_plays_ru.txt. Также сохраняется обученная модель word2vec в data/plays_ru/w2v_model_plays_ru.bin.
Для перевода слов из обучающей выборки в вектора достаточно передать методу build_word2vec() имя соответствующего файла и задать желаемые параметры.
3. Обучение сети.
На этом этапе выполняется обучение модели seq2seq на уже подготовленных ранее данных. За это отвечает модуль text_to_text.py, состоящий из класса TextToText. Данный класс осуществляет обучение сети, сохранение модели сети и весовых коэффициентов, и позволяет удобно взаимодействовать с обученной моделью.
Для обучение необходим файл data/plays_ru/encoded_plays_ru.npz, содержащий пары [вопрос,ответ], закодированные в вектора, которые были получены на предыдущем этапе. В процессе обучения после каждой 5-ой эпохи (это значение можно изменить) сохраняется крайний промежуточный результат обучения сети в файл data/plays_ru/model_weights_plays_ru_[номер_итерации].h5, а на последней итерации в файл data/plays_ru/model_weights_plays_ru.h5 (итерация – один цикл обучения сети, некоторое число эпох, после которых происходит сохранение весов в файл и можно например оценить точность работы сети или вывести другие её параметры. По умолчанию число эпох равно 5, а общее число итераций 200). Модель сети сохраняется в файле data/plays_ru/model_plays_ru.json.
После обучения сети выполняется оценка качества обучения путём подачи на вход обученной сети всех вопросов и сравнения ответов сети с эталонными ответами из обучающей выборки. Если точность оцениваемой модели получается выше 75%, то неправильные ответы сети сохраняются в файл data/plays_ru/wrong_answers_plays_ru.txt (что бы их можно было потом проанализировать).
Для обучения сети достаточно передать методу train() имя соответствующего файла и задать желаемые параметры.
4. Построение языковой модели и словаря для PocketSphinx.
Этот этап нужен в случае, если будет использоваться распознавание речи. На этом этапе осуществляется создание статической языковой модели и фонетического словаря для PocketSphinx на основе вопросов из обучающей выборки (осторожно: чем больше вопросов в обучающей выборке, тем дольше PocketSphinx будет распознавать речь). Для этого используется метод build_language_model() (которая обращается к text2wfreq, wfreq2vocab, text2idngram и idngram2lm из CMUclmtk_v0.7) класса LanguageModel из модуля preparing_speech_to_text.py. Данный метод использует вопросы из файла с исходной обучающей выборкой (до их подготовки модулем source_to_prepared.py), сохраняет языковую модель в файл temp/prepared_questions_plays_ru.lm, а словарь в temp/prepared_questions_plays_ru.dic (plays_ru может меняться, в зависимости от того, какая обучающая выборка была использована). В конце работы языковая модель и словарь будут скопированы в /usr/local/lib/python3.х/dist-packages/pocketsphinx/model с именами ru_bot_plays_ru.lm и ru_bot_plays_ru.dic (plays_ru может меняться так же, как и на предыдущем этапе, потребуется ввод пароля root-пользователя).
2. Работа с обученной моделью seq2seq в текстовом режиме
Для взаимодействия с обученной моделью seq2seq предназначена функция predict() (которая является обёрткой над методом predict() класса TextToText из модуля text_to_text.py) модуля bot.py. Данная функция поддерживает несколько режимов работы. В текстовом режиме, т.е. когда пользователь вводит вопрос с клавиатуры и сеть отвечает текстом, используется только метод predict() класса TextToText из модуля text_to_text.py. Данный метод принимает строку с вопросом к сети и возвращает строку с ответом сети. Для работы необходимы: файл data/plays_ru/w2v_model_plays_ru.bin с обученной моделью word2vec, файл data/plays_ru/model_plays_ru.json с параметрами модели сети и файл data/plays_ru/model_weights_plays_ru.h5 с весами обученной сети.
Для запуска бота в данном режиме нужно запустить bot.py с параметром predict. Например, так:
python3 bot.py predict
Так же можно просто запустить bot.py (или выполнить run_bot.sh) и в предложенном меню выбрать режим 2 и 1.
3. Работа с обученной моделью seq2seq с озвучиванием ответов с помощью RHVoice
Данный режим отличается от предыдущего тем, что функции predict() модуля bot.py передаётся параметр speech_synthesis = True. Это означает, что взаимодействие с сетью будет проходить так же, как и в режиме 2, но ответ сети дополнительно будет озвучиваться.
Озвучивание ответов, т.е. синтез речи, реализован в методе get() класса TextToSpeech из модуля text_to_speech.py. Данный класс требует установленного RHVoice-client и с помощью аргументов командной строки передаёт ему необходимые параметры для синтеза речи (об установке RHVoice и примеры обращения к RHVoice-client можно посмотреть в install_files/Install RHVoice.txt). Метод get() принимает на вход строку, которую нужно преобразовать в речь, и, если требуется, имя .wav файла, в который будет сохранена синтезированная речь (с частотой дискретизации 32 кГц и глубиной 16 бит, моно; если его не указывать – речь будет воспроизводиться сразу после синтеза). При создании объекта класса TextToSpeech можно указать имя используемого голоса. Поддерживается 4 голоса: мужской Aleksandr и три женских – Anna, Elena и Irina (подробнее в RHVoice Wiki).
Для запуска бота в данном режиме нужно запустить bot.py с параметрами predict -ss. Например, так:
python3 bot.py predict -ss
Так же можно просто запустить bot.py (или выполнить run_bot.sh) и в предложенном меню выбрать режим 3 и 1.
4. Работа с обученной моделью seq2seq с распознаванием речи с помощью PocketSphinx
Для работы в этом режиме необходимо функции predict() модуля bot.py передать параметр speech_recognition = True. Это означает, что взаимодействие с сетью, а точнее ввод вопросов, будет осуществляться с помощью голоса.
Распознавание речи реализовано в методе get() класса SpeechToText модуля speech_to_text.py. Данный класс использует PocketSphinx и языковую модель со словарём (ru_bot_plays_ru.lm и ru_bot_plays_ru.dic), которые были построены в режиме обучения сети. Метод get() может работать в двух режимах: from_file – распознавание речи из .wav или .opus файла с частотой дискретизации >=16кГц, 16bit, моно (имя файла передаётся в качестве аргумента функции) и from_microphone – распознавание речи с микрофона. Режим работы задаётся при создании экземпляра класса SpeechRecognition, т.к. загрузка языковой модели занимает некоторое время (чем больше модель, тем дольше она загружается).
Для запуска бота в данном режиме нужно запустить bot.py с параметрами predict -sr. Например, так:
python3 bot.py predict -sr
Так же можно просто запустить bot.py (или выполнить run_bot.sh) и в предложенном меню выбрать режим 4 и 1.
5. Работа с обученной моделью seq2seq с озвучиванием ответов и распознаванием речи
Это комбинация режимов 3 и 4.
Для работы в этом режиме необходимо функции predict() модуля bot.py передать параметры speech_recognition = True и speech_synthesis = True. Это означает, что ввод вопросов будет осуществляться с помощью голоса, а ответы сети будут озвучиваться. Описание используемых модулей можно найти в описании режимов 3 и 4.
Для запуска бота в данном режиме нужно запустить bot.py с параметрами predict -ss -sr. Например, так:
python3 bot.py predict -sr -ss
или
python3 bot.py predict -ss -sr
Так же можно просто запустить bot.py (или выполнить run_bot.sh) и в предложенном меню выбрать режим 5 и 1.
RESTful сервер
Данный сервер предоставляет REST-api для взаимодействия с ботом. При старте сервера загружается нейронная сеть, обученная на наборе данных из пьес. Наборы данных из произведений и субтитров пока не поддерживаются.
Сервер реализован с помощью Flask, а многопоточный режим (production-версия) с помощью gevent.pywsgi.WSGIServer. Также сервер имеет ограничение на размер принимаемых данных в теле запроса равное 16 Мб. Реализация находится в модуле rest_server.py.
Запустить WSGI сервер можно выполнив run_rest_server.sh (запуск WSGI сервера на 0.0.0.0:5000).
Сервер поддерживает аргументы командной строки, которые немного упрощают его запуск. Аргументы имеют следующую структуру: [ключ(-и)] [адрес:порт].
Возможные ключи:
-d – запуск тестового Flask сервера (если ключ не указывать – будет запущен WSGI сервер)
-s – запуск сервера с поддержкой https (используется самоподписанный сертификат, получен с помощью openssl)
Допустимые варианты адрес:порт:
host:port – запуск на указанном host и port
localaddr:port – запуск с автоопределением адреса машины в локальной сети и указанным port
host:0 или localaddr:0 – если port = 0, то будет выбран любой доступный порт автоматически
Список возможных комбинаций аргументов командной строки и их описание:
без аргументов – запуск WSGI сервера с автоопределением адреса машины в локальной сети и портом 5000. Например: python3 rest_server.py
host:port – запуск WSGI сервера на указанном host и port. Например: python3 rest_server.py 192.168.2.102:5000
-d host:port – запуск тестового Flask сервера на указанном host и port. Например: python3 rest_server.py -d 192.168.2.102:5000
-d localaddr:port – запуск тестового Flask сервера с автоопределением адреса машины в локальной сети и портом port. Например: python3 rest_server.py -d localaddr:5000
-s – запуск WSGI сервера с поддержкой https, автоопределением адреса машины в локальной сети и портом 5000. Например: python3 rest_server.py -s
-s host:port – запуск WSGI сервера с поддержкой https на указанном host и port. Например: python3 rest_server.py -s 192.168.2.102:5000
-s -d – запуск тестового Flask сервера с поддержкой https на 127.0.0.1:5000. Например: python3 rest_server.py -s -d
-s -d host:port – запуск тестового Flask сервера с поддержкой https на указанном host и port. Например: python3 rest_server.py -s -d 192.168.2.102:5000
-s -d localaddr:port – запуск тестового Flask сервера с поддержкой https, автоопределением адреса машины в локальной сети и портом port. Например: python3 rest_server.py -s -d localaddr:5000
Сервер может сам выбрать доступный порт, для этого нужно указать в host:port или localaddr:port порт 0 (например: python3 rest_server.py -d localaddr:0).
Всего поддерживается 5 запросов:
GET-запрос на /chatbot/about, вернёт информацию о проекте
GET-запрос на /chatbot/questions, вернёт список всех поддерживаемых вопросов
POST-запрос на /chatbot/speech-to-text, принимает .wav/.opus-файл и возвращает распознанную строку
POST-запрос на /chatbot/text-to-speech, принимает строку и возвращает .wav-файл с синтезированной речью
POST-запрос на /chatbot/text-to-text, принимает строку и возвращает ответ бота в виде строки
Описание сервера
1. Сервер имеет базовую http-авторизацию. Т.е. для получения доступа к серверу надо в каждом запросе добавить заголовок, содержащий логин:пароль, закодированный с помощью base64 (логин: bot, пароль: test_bot). Пример на python:
2. В запросе на распознавание речи (который под номером 3) сервер ожидает .wav или .opus файл (>=16кГц 16бит моно) с записанной речью, который так же передаётся в json с помощью кодировки base64 (т.е. открывается .wav/.opus-файл, читается в массив байт, потом кодирутеся base64, полученный массив декодируется из байтовой формы в строку utf-8 и помещается в json), в python это выглядит так:
# Формирование запроса
auth = base64.b64encode('testbot:test'.encode())
headers = {'Authorization' : "Basic " + auth.decode()}

with open('test.wav', 'rb') as audio:
    data = audio.read()
data = base64.b64encode(data)
data = {'wav' : data.decode()}

# Отправка запроса серверу
r = requests.post('http://' + addr + '/chatbot/speech-to-text', headers=headers, json=data)

# Разбор ответа
data = r.json()
data = data.get('text')
print(data)
3. В запросе на синтез речи (который под номером 4) сервер пришлёт в ответе json с .wav-файлом (16бит 32кГц моно) с синтезированной речью, который был закодирован так, как описано выше (что бы обратно его декодировать нужно из json получить нужную строку в массив байт, потом декодировать его с помощью base64 и записать в файл или поток, что бы потом воспроизвести), пример на python:
# Формирование запроса
auth = base64.b64encode('testbot:test'.encode())
headers = {'Authorization' : "Basic " + auth.decode()}
data = {'text':'который час'}

# Отправка запроса серверу
r = requests.post('http://' + addr + '/chatbot/text-to-speech', headers=headers, json=data)

# Разбор ответа
data = r.json()
data = base64.b64decode(data.get('wav'))
with open('/home/vladislav/Проекты/Voice chat bot/temp/answer.wav', 'wb') as audio:
    audio.write(data)
Передаваемые данные в каждом запросе
Все передаваемые данные обёрнуты в json (в том числе и ответы с ошибками).
HTTP/1.1 200 OK
Content-Type: application/json
Content-Length: 68
Date: Fri, 02 Nov 2018 16:41:22 GMT
{
"text" : "это снова я"
}
Предполагаемый алгоритм работы с сервером
Запросить список вопросов у сервера (запрос 2) и отобразить его
В зависимости от выбранного режима:
Записать речь с микрофона клиента
Отправить на сервер (запрос 3) и получить ответ с распознанным текстом
Отобразить текст в поле ввода
Отправить текст на сервер (запрос 5) и получить ответ бота
Отправить ответ бота на сервер (запрос 4) и получить аудиофайл с синтезированной речью
Воспроизвести аудиофайл
Если клиент хочет узнать информацию о данном проекте, послать запрос 1 на сервер и отобразить полученные данные
Docker-образ с RESTful сервером
В проекте содержится Dockerfile, который позволяет собрать docker образ на основе данного проекта. Если для установки всех зависимостей вы использовали install_packages.sh и ранее Docker вы не устанавливали, вам необходимо установить его вручную. Например, так (проверено в Ubuntu 16.04-18.04):
После установки выполните sudo systemctl status docker что бы убедиться, что всё установилось и работает (в выводе данной команды вы найдёте строку с зелёным текстом active (running)).
Для сборки образа необходимо перейти в терминале в папку с проектом и выполнить (-t — запуск терминала, . — директория, из которой вызывается docker build (точка — значит в текущей директории находятся все файлы для образа), voice_chatbot:0.1 — метка образа и его версия):
sudo docker build -t voice_chatbot:0.1 .
После успешного выполнения данной операции вы можете вывести список имеющихся образов, выполнив:
sudo docker images
В полученном списке вы увидите наш образ — voice_chatbot:0.1.
Теперь вы можете запустить этот образ (-t — запуск терминала, -i — интерактивный режим, --rm — удалить контейнер после завершения его работы, -p 5000:5000 — пробросить все подключения на порт 5000 к машине-хосту в контейнер на порт 5000 (вы так же можете явно указать другой адрес, к которому нужно будет подключиться извне, например: -p 127.0.0.1:5000:5000)):
sudo docker run -ti --rm -p 5000:5000 voice_chatbot:0.1
В результате запустится RESTful сервер на 0.0.0.0:5000 и можно к нему обращаться по указанному в терминале адресу (если вы не указали другой при запуске образа).
Примечание: собранный docker-образ весит 5.2Гб. Исходные файлы проекта так же включают файл .dockerignore, в котором находятся имена файлов, которые не нужно добавлять в образ. Для минимизации размера итогового образа, из него были исключены все файлы, относящиеся к наборку данных из рассказов и из субтитров, файлы с промежуточными результатами обработки данных и обучения нейронной сети. Это значит, что образ содержит только файлы обученной сети и сырые исходные наборы данных.
На всякий случай, в исходных файлах проекта есть файл command_for_docker.txt, содержащий минимально необходимый набор команд для работы с docker.
Если у вас возникнут вопросы или вы хотите сотрудничать, можете написать мне на почту: vladsklim@gmail.com или в LinkedIn.
This is a simple classification problem trained on python scikit-learn library.The classification model takes
the independent variable eg. age,sex,cholestrol,blood pressure etc.,from heart attack data set to predict
whether the person will get heart attack or not.
In this project chi-squre test has been used for to checkfeature importance of categorical variableand independent t-test is used to compare the mean of variables
grouped on the basis of output category and by finding correlation among numerical variables to get the
importance of each variable in deciding output.Features renaming also done with help of google,you can find here.
We also use Pipeline method to apply 10 classifiction algorithms(1.logistic Regression 2.Decisiontreeclassifier
3.Randomforestclassifier 4.GaussianNB 5.KNN 6.Gboost Classifier 7.AdaboostClassifier8.SGDClassifier 9.SVC 10.MLP Classifier)
to get the best accuracy which i have got in KNN=82.4%.Then i also apply for loop to get the best random
state producing good accuracy and then we have got accuracy of 90% with choosing appropriate n_nieghour parameter which is n_neighour=6.
After plotting AUC-ROC curve we have got the value AUC=93% which is a good value for a model.
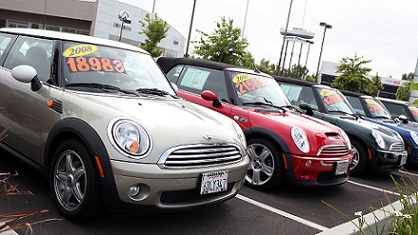
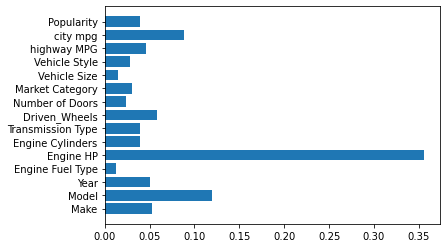
This is a regression based ML plroject build on python scikit-learn library.The aim of this project is to predict the price of the car on the basis of its given independent feature eg. model, engine feul type, engine HP, engine cylinder, transmission type, driven_Wheels, number of door, market category, vehicle size, vehicle style,
highway MPG, city mpg, Popularity.
We applied 11 ML regression algorithms to build our model, then we get best accuracy in Extra tree regressor which is 97%.
After analysing the features and correlation we found ‘Engine HP’ is the most important factor for the price of the car.
This is a Regression problem trained on python scikit-learn libarary.The data is related to civil engineering/Architecture where compressive strengh of material being used is import factor to determone the stability, sustainibility of building/bridge/construction.The target aim of the model is to predict the compressive strength of concrete on the basis of independent variable -cement,Blast Furnace Slag,Fly Ash,Water,Superplasticizer,Coarse Aggregate,Fine Aggregate.
we used 12 regression algorithms to build our ML model where we have got the best result with Extra Tree Regressor having accuracy of 97%,RSME=4.08 which is very good for a model.
this is a unsupervised machine learning problem where diifferent segment or group of customer has to be made using K-mean clusterring and hierarchical clustering algorithm .
After taht we have to identify our target customer who has more potential to give profit.
You can visit the data by clicking on the image below.
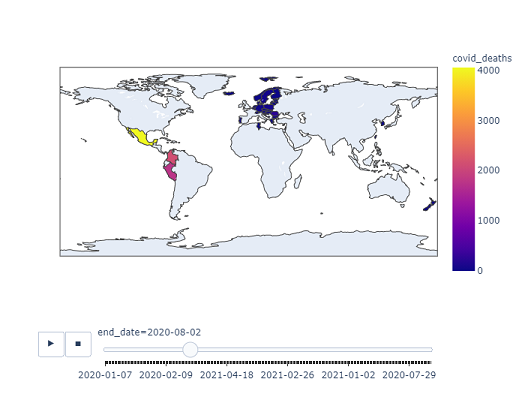
This is visual analysis based project where we have the data set of 45 countries. Using plotlly chroropleth, seaborn, matplotlib we made different plot to analyse the count of
daeth, rate of death due to covid-19 in different countries with respect to time.
We also found that Mexico has the highest count and rate of death.For more detail about the dataset please click on the image below
This is a imbalance classification based ML project where we are given a direct marketing campaign (phone call) dataset obtained from a bank. The data contains 3090 rows and each row refers to an individual customer record. The dataset contains 15 input attributes and one target or class label attribute (subscribed to term deposit).
We used 8 classification algorithms to build our model on sklearn. Smote technique has been used to tackle the imbalance of the data using imblearn package.
We got the best accuracy with Decision tree model accuracy =92% and f1-score =.93, after analysing the correlation and feature importance we got the’duration’ is the most important factor to decide whether customer takes subscription or not.
Banking dataset that helps running a campaign. how do banks select target customers so that chances of selling their product maximize, this will help you understand these things.The targeted customer has to be predicted on the basis of some features eg.age,education,marital status,salary,housing etc. We have build a classification model to classify the targeted customer.
you can get the dataset from kaggle by clicking on below image
predicting the churn, we can react in time and try to keep the client who wants to leave. Based on the data about the services that the client uses, we can make him a special offer, trying to change his decision to leave the operator. This will make the task of retention easier to implement than the task of attracting new users, about which we do not know anything yet.
We build the classification model to predict whether the customer will churn or nor.Here we have focused on recall rather than accuracy and we get recall upto 80%.
You can find the dataset on kaggle by clicking on below image.
This is a linear regression based problem where the price of the house is predicted on the basis of its feature eg. no of bedroom, sqft area,floor waterfront,condition, age etc.
we also find the main factor which determine the price of house.
You can find the dataset on kaggle by clicking on below image
• Using Excel , the output of the topics modelling which has been applied on the data in python is converted into csv format and then imported into MySql.
• Transformed the data using DAX calculation in Power BI and prepared the dashboard to extract the business insights in the data.
• I was assisted in developing Data warehouse using MY SQL to convert unstructured data into Fact and Dimension table for more informative and accessible data.
• Prepared BI dashboard using Power BI for day wise, month wise ,year wise , hour wise mall entry analysis report
Creative Commons Legal Code

CC0 1.0 Universal

    CREATIVE COMMONS CORPORATION IS NOT A LAW FIRM AND DOES NOT PROVIDE
    LEGAL SERVICES. DISTRIBUTION OF THIS DOCUMENT DOES NOT CREATE AN
    ATTORNEY-CLIENT RELATIONSHIP. CREATIVE COMMONS PROVIDES THIS
    INFORMATION ON AN "AS-IS" BASIS. CREATIVE COMMONS MAKES NO WARRANTIES
    REGARDING THE USE OF THIS DOCUMENT OR THE INFORMATION OR WORKS
    PROVIDED HEREUNDER, AND DISCLAIMS LIABILITY FOR DAMAGES RESULTING FROM
    THE USE OF THIS DOCUMENT OR THE INFORMATION OR WORKS PROVIDED
    HEREUNDER.

Statement of Purpose

The laws of most jurisdictions throughout the world automatically confer
exclusive Copyright and Related Rights (defined below) upon the creator
and subsequent owner(s) (each and all, an "owner") of an original work of
authorship and/or a database (each, a "Work").

Certain owners wish to permanently relinquish those rights to a Work for
the purpose of contributing to a commons of creative, cultural and
scientific works ("Commons") that the public can reliably and without fear
of later claims of infringement build upon, modify, incorporate in other
works, reuse and redistribute as freely as possible in any form whatsoever
and for any purposes, including without limitation commercial purposes.
These owners may contribute to the Commons to promote the ideal of a free
culture and the further production of creative, cultural and scientific
works, or to gain reputation or greater distribution for their Work in
part through the use and efforts of others.

For these and/or other purposes and motivations, and without any
expectation of additional consideration or compensation, the person
associating CC0 with a Work (the "Affirmer"), to the extent that he or she
is an owner of Copyright and Related Rights in the Work, voluntarily
elects to apply CC0 to the Work and publicly distribute the Work under its
terms, with knowledge of his or her Copyright and Related Rights in the
Work and the meaning and intended legal effect of CC0 on those rights.

1. Copyright and Related Rights. A Work made available under CC0 may be
protected by copyright and related or neighboring rights ("Copyright and
Related Rights"). Copyright and Related Rights include, but are not
limited to, the following:

  i. the right to reproduce, adapt, distribute, perform, display,
     communicate, and translate a Work;
 ii. moral rights retained by the original author(s) and/or performer(s);
iii. publicity and privacy rights pertaining to a person's image or
     likeness depicted in a Work;
 iv. rights protecting against unfair competition in regards to a Work,
     subject to the limitations in paragraph 4(a), below;
  v. rights protecting the extraction, dissemination, use and reuse of data
     in a Work;
 vi. database rights (such as those arising under Directive 96/9/EC of the
     European Parliament and of the Council of 11 March 1996 on the legal
     protection of databases, and under any national implementation
     thereof, including any amended or successor version of such
     directive); and
vii. other similar, equivalent or corresponding rights throughout the
     world based on applicable law or treaty, and any national
     implementations thereof.

2. Waiver. To the greatest extent permitted by, but not in contravention
of, applicable law, Affirmer hereby overtly, fully, permanently,
irrevocably and unconditionally waives, abandons, and surrenders all of
Affirmer's Copyright and Related Rights and associated claims and causes
of action, whether now known or unknown (including existing as well as
future claims and causes of action), in the Work (i) in all territories
worldwide, (ii) for the maximum duration provided by applicable law or
treaty (including future time extensions), (iii) in any current or future
medium and for any number of copies, and (iv) for any purpose whatsoever,
including without limitation commercial, advertising or promotional
purposes (the "Waiver"). Affirmer makes the Waiver for the benefit of each
member of the public at large and to the detriment of Affirmer's heirs and
successors, fully intending that such Waiver shall not be subject to
revocation, rescission, cancellation, termination, or any other legal or
equitable action to disrupt the quiet enjoyment of the Work by the public
as contemplated by Affirmer's express Statement of Purpose.

3. Public License Fallback. Should any part of the Waiver for any reason
be judged legally invalid or ineffective under applicable law, then the
Waiver shall be preserved to the maximum extent permitted taking into
account Affirmer's express Statement of Purpose. In addition, to the
extent the Waiver is so judged Affirmer hereby grants to each affected
person a royalty-free, non transferable, non sublicensable, non exclusive,
irrevocable and unconditional license to exercise Affirmer's Copyright and
Related Rights in the Work (i) in all territories worldwide, (ii) for the
maximum duration provided by applicable law or treaty (including future
time extensions), (iii) in any current or future medium and for any number
of copies, and (iv) for any purpose whatsoever, including without
limitation commercial, advertising or promotional purposes (the
"License"). The License shall be deemed effective as of the date CC0 was
applied by Affirmer to the Work. Should any part of the License for any
reason be judged legally invalid or ineffective under applicable law, such
partial invalidity or ineffectiveness shall not invalidate the remainder
of the License, and in such case Affirmer hereby affirms that he or she
will not (i) exercise any of his or her remaining Copyright and Related
Rights in the Work or (ii) assert any associated claims and causes of
action with respect to the Work, in either case contrary to Affirmer's
express Statement of Purpose.

4. Limitations and Disclaimers.

 a. No trademark or patent rights held by Affirmer are waived, abandoned,
    surrendered, licensed or otherwise affected by this document.
 b. Affirmer offers the Work as-is and makes no representations or
    warranties of any kind concerning the Work, express, implied,
    statutory or otherwise, including without limitation warranties of
    title, merchantability, fitness for a particular purpose, non
    infringement, or the absence of latent or other defects, accuracy, or
    the present or absence of errors, whether or not discoverable, all to
    the greatest extent permissible under applicable law.
 c. Affirmer disclaims responsibility for clearing rights of other persons
    that may apply to the Work or any use thereof, including without
    limitation any person's Copyright and Related Rights in the Work.
    Further, Affirmer disclaims responsibility for obtaining any necessary
    consents, permissions or other rights required for any use of the
    Work.
 d. Affirmer understands and acknowledges that Creative Commons is not a
    party to this document and has no duty or obligation with respect to
    this CC0 or use of the Work.
Customer Churn Prediction using Statistical Learning
Overview
This project focuses on predicting customer churn for bank customers using statistical learning techniques. Customer retention is crucial for organizational success, especially in the financial sector. The data used in this project comes from an actual bank dataset obtained via Kaggle.
The goal is to build a predictive model that helps banks identify which customers are likely to churn, allowing them to implement proactive retention strategies.
Algorithms Used
I implemented two statistical learning algorithms from scratch in R, without using any built-in machine learning functions:
Logistic Regression: A widely used algorithm for binary classification problems.
Decision Trees: A model that provides high interpretability and is particularly useful for understanding customer behavior.
These models were fully coded from the ground up, showcasing the detailed mathematical understanding and coding skills behind each technique.
Performance Metrics
To evaluate the models, I used the Area Under the Receiver Operating Characteristic (AUROC) curve:
Logistic Regression performed better overall.
Decision Trees offered higher interpretability, making them useful for marketing strategy insights.
Results
Logistic Regression: Achieved an AUROC of 0.87, indicating a strong ability to distinguish between churners and non-churners.
Decision Tree: Achieved an AUROC of 0.79 but provided valuable insights into customer behavior patterns.
Key Feature: Code from Scratch
One of the key contributions of this project is that all algorithms were developed from scratch. This provides a deeper understanding of the mechanics behind Logistic Regression and Decision Trees, as well as the coding techniques required to implement these models without relying on external machine learning libraries.
Project Structure
/BinaryTreeDecision.R: R script implementing the Decision Tree model from scratch.
/LogisticRegression.R: R script implementing Logistic Regression from scratch.
/churn.csv: The dataset used for training and testing the models.
Install the required packages:
The project requires R but does not rely on built-in machine learning libraries. The code uses basic R libraries for handling data:
rpart for simple decision-making logic (not model building).
glm is not used here; the logistic regression was coded from scratch.
Run the R scripts:
Open the .R scripts in your RStudio or R environment and run them to see the model outputs.
A Razor Class Library built using the Dynamsoft JavaScript Camera Enhancer SDK, which provides a simple way to integrate camera access into Blazor applications.
Astro Data API — an open API server for publishing observations of astronomical events, data exchange and automation of telescopes. Event publications (telegrams) support markdown with gfm and latex included.
FROM docker.pkg.github.com/stiliajohny/python-prometheus-speedtest/python-prometheus-speedtest:0.0.1aplha
Roadmap
See the open issues for a list of proposed features (and known issues).
Contributing
Contributions are what make the open source community such an amazing place to be learn, inspire, and create. Any contributions you make are greatly appreciated.
Fork the Project
Create your Feature Branch (git checkout -b feature/AmazingFeature)
Commit your Changes (git commit -m 'Add some AmazingFeature')
Push to the Branch (git push origin feature/AmazingFeature)
Open a Pull Request
License
Distributed under the GPL-3.0 License. See LICENSE for more information.
The adoption of convolutional neural network (CNN) models in high-stake domains is hindered by their inability to meet
society’s demand for transparency in decision-making. So far, a growing number of methodologies have emerged for
developing CNN models that are interpretable by design. However, such models are not capable of providing
interpretations in accordance with human perception, while maintaining competent performance. In this paper,
we tackle these challenges with a novel, general framework for instantiating inherently interpretable CNN models,
named E pluribus unum interpretable CNN (EPU-CNN). An EPU-CNN model consists of CNN sub-networks, each of which receives
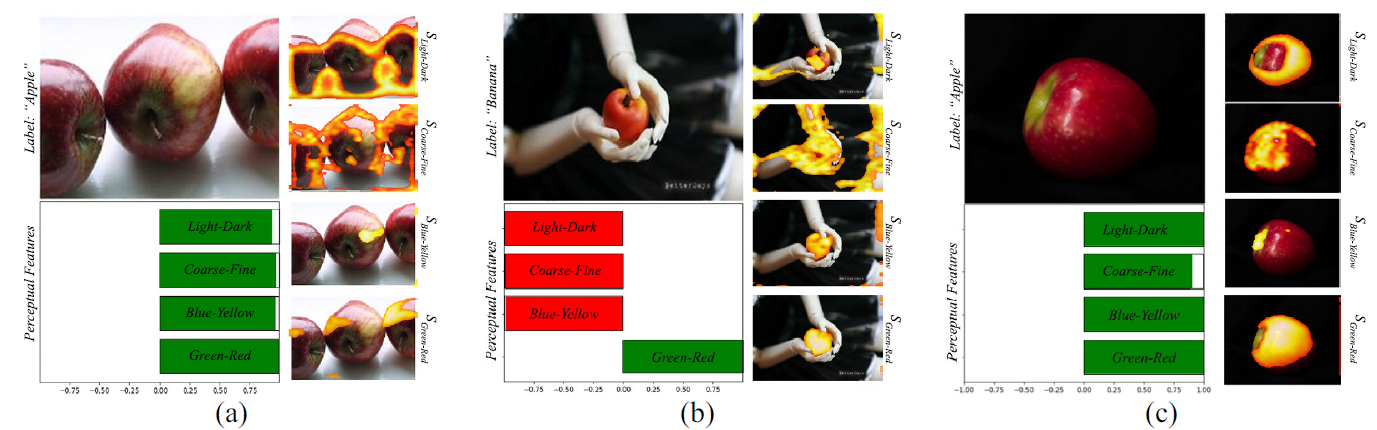
a different representation of an input image expressing a perceptual feature, such as color or texture. The output of an
EPU-CNN model consists of the classification prediction and its interpretation, in terms of relative contributions of
perceptual features in different regions of the input image. EPU-CNN models have been extensively evaluated on various
publicly available datasets, as well as a contributed benchmark dataset. Medical datasets are used to demonstrate the
applicability of EPU-CNN for risk-sensitive decisions in medicine. The experimental results indicate that EPU-CNN models
can achieve a comparable or better classification performance than other CNN architectures while providing humanly
perceivable interpretations.
Usage
EPU-CNN, to the best of our knowledge, is the first framework based on Generalized Additive Models for the construction of Inherently
Interpretable CNN models, regardless of the base CNN architecture used and the application domain.
Unlike current approaches, the models constructed by EPU-CNN enables interpretable classification based both
on perceptual features and their spatial expression within an image; thus, it enables a more thorough and intuitive
interpretation of the classification results.
EPU-CNN is capable of providing both qualitative and quantitative classification interpretations. An example of
image-specific interpretations provided by the EPU-CNN is shown below:
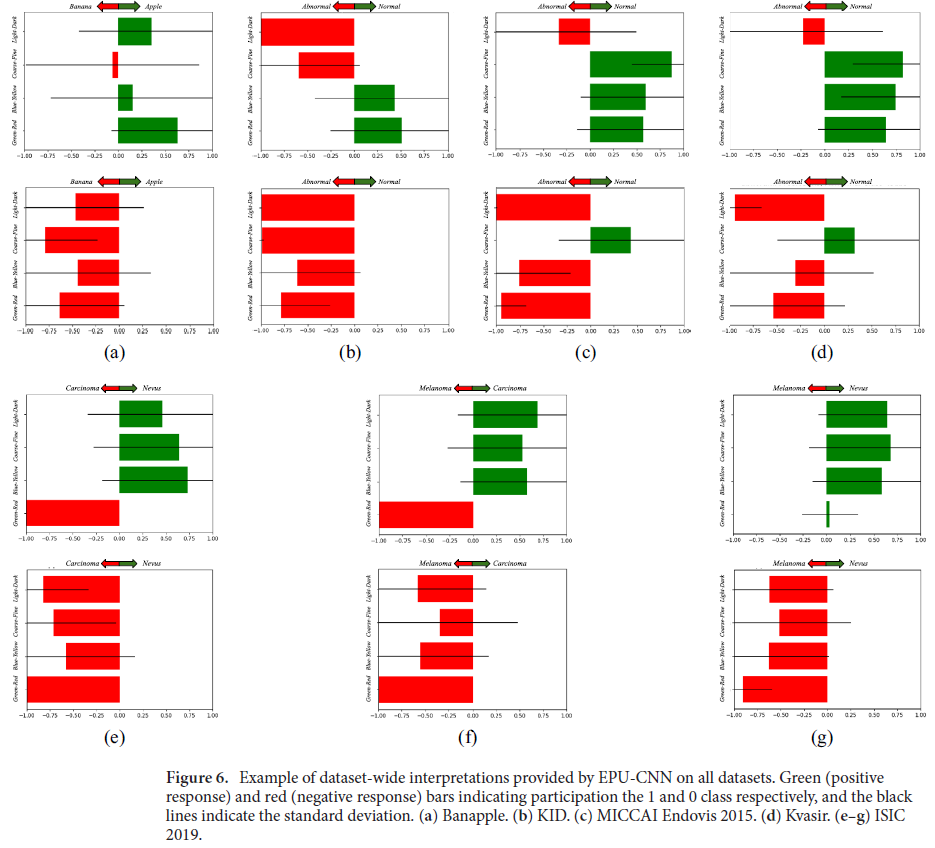
The quantitative interpretations on each image can be used to construct dataset level interpretations, which can be used
to identify the most important perceptual features for the classification task. An example of such an interpretation is
shown below:
To use EPU-CNN, you need to provide a base CNN architecture and a perceptual feature extractor. In this repository
we provide exemplary base CNN architectures and perceptual feature extractors used in our experimentations. An example of usage
is shown below:
The subnet defines the base CNN architecture. In our implementation init_size defines the number of
features in the first convolutional layers that is incremented by a factor of 2 in each subsequent convolutional
block of the base CNN architecture. hidden_units defines the number of hidden units in the fully connected layers of
the base CNN architecture. num_pfms defines the number of perceptual feature maps used as input for a particular
application.
The subnet_act defines the output activation function of the base CNN architecture and the epu_act defines the inverse
of the link function g used to provide the final output of the EPU-CNN model.
Currently, the EPUNet class has an implementation of get_pfm method that can be used to extract the PFMs of
green-red, blue-yellow, coarse-fine and light-dark. The get_pfm takes as input a list of images (np.ndarray) and
outputs a tuple of PFMs. In its current form, EPUNet takes as input for training and inference a tuple of PFMs where
each position of the tuple is an np.ndarray of shape (batch_size, height, width, 1).
Training
An example of the training process is provided in the train.py script. The train.py script can be used to train an
EPU-CNN model given a set of training images and target labels. The train.py script can be used as follows:
Currently EPUNet provides its interpretations using the get_interpretation and get_prm methods. The
get_interpretation returns the qunatitative contributions of each PFM used whereas get_prm returns the
spatial expression of each PFM used on the image. To get the exact results with the paper the get_prm results need
to be propagated to the refine_prm method of the EPUNet class.
To work, call after the loading of the model or the weights to the initialized object of epu don’t use the .predict method
but call the model as epu(...) on a PFM tensor instead.
The Banapple, KID Dataset, Kvasir and ISIC-2019 have been downloaded from their respective sources and
have been curated manually for the training and evaluation of EPU-CNN models. The CIFAR-10, MNIST,
Fashion-MNIST and iBeans datasets have been used via the Tensorflow Datasets API.
TODO
Add references to all the paper datasets
Refine README.md
Add requirements.txt
Implement interpretation visualizations in a nice format
Add evaluation code
Add inference code
Add Wavelet PFM extraction
Add Multiclass Training and Evaluation code
Replace the .arxiv with official Scientific Reports citation
If you find this work useful, please cite our paper:
@article{dimas2023pluribus,
  title = {E pluribus unum interpretable convolutional neural networks},
  author = {Dimas, George and Cholopoulou, Eirini and Iakovidis, Dimitris K},
  journal = {Scientific Reports},
  volume = {13},
  number = {1},
  pages = {11421},
  year = {2023},
  publisher = {Nature Publishing Group UK London}
}

.jpg)


.jpg)